Day, Week and Month Views
Contents |
Overview
Planbook offers a day, week and month mode for for viewing and selecting your lesson plans. These modes can be toggled using the toggle button at the top of the main planbook window, or by using keyboard commands. Day and Week mode also be toggled by clicking the button at the top of every day that shows the date.
Week Mode
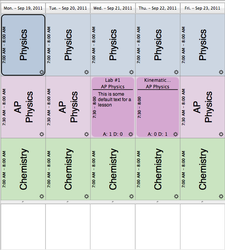
Planbook defaults to week mode when opening a new or existing file. This mode allows you to see an overview of all the days you teach in a single week.
Week mode can be enabled by setting the toggle button found at the top of the screen to the Week setting. You can also enable week mode with the View-->By Week menu item or the command-shift-W keyboard shortcut.
If you are viewing your plans in day mode, you can easily return to week mode by clicking the button listing the date at the top of the day.
The image to the left shows a version of the week view for an example file. Note that the currently selected lesson is designated with a black outline. Lessons with information entered into them are shown in a darker variant of the color you selected for that class. Also, note the existence of the text boxes at the bottom of every day. These text entry areas are designed to hold meeting information, reminders or other important information specific to that day that doesn't belong in a lesson plan.
The daily notes text areas may be resized by dragging the divider between the text area and the lesson views up or down. All the notes views resize synchronously.Day Mode
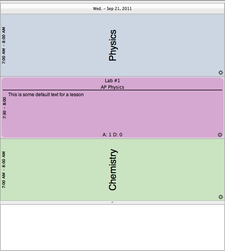
Day mode is a useful view for focusing on a single day's lessons. Viewing in Day mode also gives each lesson view more space, enabling more of the entered lesson text to be visible in each lesson view.
Day mode can be enabled by switching the toggle button at the top of the screen to day. You can also enter Day mode using the View-->By Day menu item or its associated keyboard shortcut- command-shift-D. You can also switch to day mode from week mode by clicking the button (that lists the date) at the top of any day.
You can easily switch back to week mode by clicking the date button at the top of the view.
The image to the left shows an example of Day mode. Notice that all of the classes have expanded to fill the available space. Lessons with text entered still register in a darker, more opaque way. The notes field below the day has also expanded and allows the viewing and entering of longer blocks of text without scrolling.
The notes view can also be resized by dragging the divider just above it. Upon shifting back to Week mode, all the notes views will adopt the new size.
Month Mode
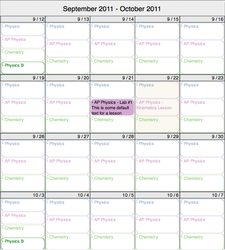
Planbook also features a Month mode which, in the interests of precision, is actually a four week view. This mode is nice for getting an overview of your lessons over a long period of time.
You can enter the month mode either by clicking the Month section of the toggle button at the top of the screen or by using the View-->By Month menu item (or its associated keyboard shortcut command-shift-M.
Month mode, due to the density of information being displayed, behaves a little differently from the other modes. The selected lesson is the only lesson with an opaque, deeply colored, background. Today's lessons are indicated with a slightly different background color.
The label at the top of the Month mode shows the month (or months) that are currently displayed.
The daily notes fields are inaccessible from this mode.
The settings panel is also inacessible from this mode.


