Weekly Report
Contents |
Overview
Teachers often need to print, email or otherwise share their lesson plans with others. Planbook includes features to generate PDF reports in a variety of formats. These PDF reports can be printed, emailed or saved directly to disk. The most commonly used report is the Weekly Report which tries to replicate the view generated in the Week mode of the application.
Generate a Weekly Report
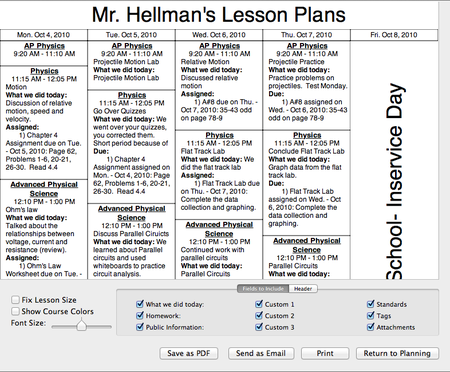
To generate a weekly report, use the Reports-->Weekly Report menu item. After pressing this menu item, the main planbook view will be replaced with a view representing the weekly report (as seen below).
Modifying the Weekly Report
Changing the Week
To change the week displayed in the weekly report, it's easiest to use the calendar found at the bottom left of the screen. It is, however, possible to use any of the | methods described in the Navigation section.
As soon as you change selection in the lower-left calendar, the weekly report will refresh to represent the newly selected date.
Changing the Fields Displayed
In the lower section of the weekly report, you'll see a set of checkboxes that control the fields that are displayed when generating the weekly report.You can choose to show any (or all) of the six text entry fields. If a field is selected to be shown, but a lesson does not have information entered into that field, the field will not be shown. You can also choose to show the Standards applied to a lesson, the keywords that a lesson has been tagged with, and the file/web link attachments.
Always Visible Fields
The lesson title and assignments are always visible in the weekly report.
Modifying the Report Format
The weekly report has three formatting options.
- The fix lesson size checkbox forces all the lesson boxes to be the same size in the weekly report. This forces each and every box to be the same size as the lesson occupying the most space.
- The show course colors checkbox applies the color assigned to a course to each lesson box.
- The font size slider allows you to make the font bigger or smaller to enhance readability or to fit the report on fewer pages.
Adding a Header to the Weekly Report
You can also add a customized header to the weekly report using the header tab. You can enter any text into the header field.
You can change the font or font size of the report header by bringing up the Font panel using the keyboard shortcut command-T.
Sharing the Weekly Report
Planbook offers three choices for sharing your weekly report with peers, administrators or others.
- The Print button brings up the standard Mac OS print dialog and lets you print directly to any printer accessible from your computer.
- The Send as Email button generates a PDF of the currently visible report and opens a new Mail message with the PDF as an attachment. Apple's Mail application is the only supported Mail program. Only Available on Mac OS 10.6+.
- The Save as PDF button generates a PDF of the currently visible report and lets you choose a name and location for the file. This file can be attached to a non Apple Mail message, shared via USB drive or otherwise manipulated in the same manner as any other file on your computer. Only Available on Mac OS 10.6+.
Pagination in the Weekly Report
The weekly report is not setup to allow single lessons to take more than a single page. If a lesson takes more space than one full page, it will be truncated. If you need to print lessons that take more than a single page, you can use the daily report.
Returning to Planning Mode
When you are done with the Weekly Report, click the Return to Planning button to return to the editing mode you were using previously.


