Attaching files and links
Jeff Hellman (Talk | contribs) (created) |
Jeff Hellman (Talk | contribs) |
||
| Line 1: | Line 1: | ||
| − | |||
==Overview== | ==Overview== | ||
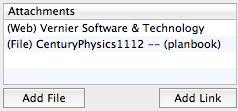
| + | [[File:attachmentstable.png|frame|right|Files and Links Attached to a Lesson]] | ||
You can attach files located on your computer or web links to sites on the Internet to the lesson plans you create in Planbook. These attachments can then be quickly opened by double clicking them. The idea is to organize your handouts and links in an intuitive way that helps you quickly access them during class. | You can attach files located on your computer or web links to sites on the Internet to the lesson plans you create in Planbook. These attachments can then be quickly opened by double clicking them. The idea is to organize your handouts and links in an intuitive way that helps you quickly access them during class. | ||
Revision as of 18:07, 21 September 2011
Contents |
Overview
You can attach files located on your computer or web links to sites on the Internet to the lesson plans you create in Planbook. These attachments can then be quickly opened by double clicking them. The idea is to organize your handouts and links in an intuitive way that helps you quickly access them during class.
Attachments can also be published to your web site or [| PlanbookConnect]. You control which attachments are published using the "publish" setting unique to each attachment.
Attaching Files
To attach a file to a lesson, click the "Add File" button found at the bottom left of the main window. This will bring up the standard Mac OS file chooser. Select the file (or files) to attach. That's it. The files you've chosen will now be linked directly to the lesson.
Attaching Web Links
To attach web links to a lesson, click the "Add Link" button and enter the URL (including http://) that you want to attach. Planbook will attach the link and attempt to determine the name of the web page you just attached.
Editing Attachment Name and Details
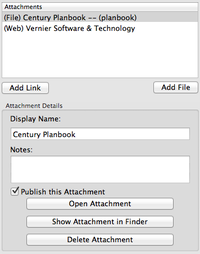
The name and details associated with an attachment cannot be edited from the Planning mode. In order to edit attachments, please enter the Detail mode by double clicking the lesson in the day, week or month view.
Once you've entered the Detail mode, click the "Assignments and Attachments" tab. You'll be presented with a view that shows all your attachments and allows you to change their name and provide notes about the attachment. You can also open the attachment, delete it or (in the case of local files) reveal the file in the Mac OS Finder.
Editing the Publish Settings for an Attachment
If you choose to publish your lesson plans to your own website or [| PlanbookConnect], your attachments will be published, too. This is often not ideal- for example, you probably don't want to publish tests or answer keys, but you might want them attached to your lesson plans. You can control which attachments are published toggling the "Publish This Attachment" checkbox off. If you toggle off this checkbox:
- The attachment will not be published to your own website, MobileMe, or via FTP.
- The attachment will be published to PlanbookConnect, but will only be viewable and downloadable when the user associated with your account is logged in. Guests and other PlanbookConnect users can not access this file.
Removing Attachments
If you no longer want an attachment connected to your lesson plans, you can easily remove the attachment by right clicking (holding control while clicking normally) on the attachment in the Planning mode. You can also remove an attachment using the delete attachment button found in the Detail mode.
When removing the file attachment from a lesson plan, the original file will not be removed.
A Note About File Attachments
Planbook does not copy or embed files that you attach to lesson plans. If you move a file that has been attached to a lesson plan, Planbook will no longer find it. If you open your Planbook data file on another computer, it will not find the files you've attached. There is a workaround for this, but it requires using [[1]] and ensuring that you have the same user name on all the computers you use. For more information, please check out information about using Planbook and Dropbox.


