Creating Assignments
Contents |
Overview
In addition to the text fields available for lesson entry, Planbook also offers the ability to create assignments. Assignments in Planbook differ from text boxes in that assignments:- Have an assigned date and a due date. The assignment appears attached to both the assigned and due lessons.
- Have an assignment title (the name of the assignment).
- Can have details about the assignment such as the pages to read or problems to work.
- Can have files and web links attached.
Creating a New Assignment
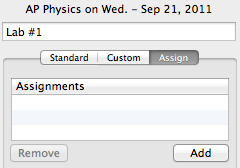
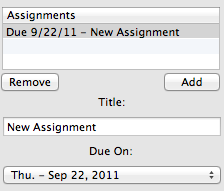
To create a new assignment, please first select the lesson to which you want to add the assignment. Remember that lessons are selected by clicking once on them in the Day, Week or Month view. Switch to the "Assign" tab (shown above). You will see an "Add" button. Clicking that button adds a new assignment to that lesson.New assignments have a default title of "New Assignment" and default to being due the next time the class happens. You can change the name of the assignment by editing the title field. A new due date may be selected using the pop up menu. Planbook allows you to set a due date 25 lessons in the future.
You can also edit the details, which are blank by default, by typing into the Details text area. Changes are saved instantly as you type.
Attaching Files and Web Links to an Assignment
Files (such as a worksheet, lab handout, etc...) and web links (references, source material, etc...) can be directly attached to an assignment. This is different than attaching files or links to a lesson. Assignment attachments *always* publish to [PlanbookConnect]. To attach files and links to an assignment, click the Add File or Add Link button. If you choose "Add File", you'll be presented with the standard Mac OS dialog for choosing files. If you choose "Add Link" you'll be presented with a window to enter a URL. Planbook does its best to find the name of the web page you attached (Internet connection required).Attachments may be removed from an assignment by right clicking on them and choosing "Remove Attachment". If you don't have a right mouse button, you can hold control and click on the attachment.
Removing an Assignment
Assignments can be removed by selecting them in the Assignments table and clicking the "Remove" button. The assignment will be removed from both the assigned and due lessons.
Assignments in the Day/Week View
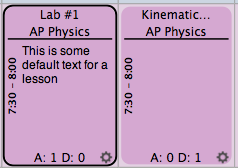
The lesson view in the Day and Week views show assignments that are assigned or due on a particular lesson. The number after the "A:" is the number of assignments assigned on a particular lesson. Similarly, the number after the "D:" tells the number of assignments due on that lesson. This is designed to give you a quick overview of what's going on during a particular lesson.
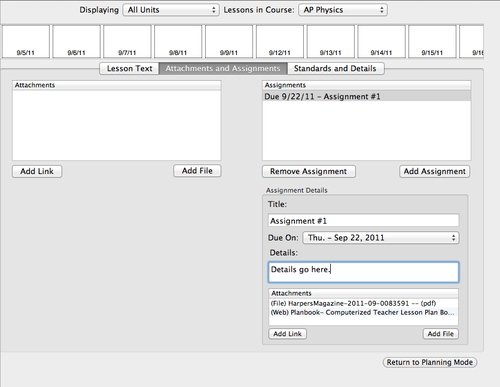
Managing Assignments from the Detail Mode
Assignments can be added, edited and removed in a manner similar to the method described above from the detail mode. The detail mode can be accessed by double clicking any lesson in the day, week or month views. The image below shows assignments as seen in the Detail mode.


