Creating your Planbook Data File
Contents |
Launching Planbook for the First Time
Planbook is much like Microsoft Word, Apple's Pages and other programs that create documents. The information for your classes is stored within a data file. The first time that you use the Planbook application, you will be asked to create a new planbook data file. While you can correct any mistakes you make later, it's easiest to carefully enter the particulars about your schedule when getting started.
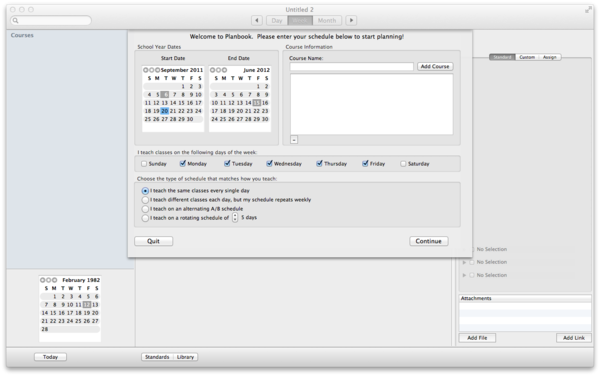
Upon launching Planbook, you will be presented with the following window.
You'll notice four areas that require your attention.
1. School Year Dates
The two calendars at the top left determine the range of dates available for lesson planning. People often choose to have a single planbook file for an entire school year, but if your schedule changes significantly at the end of a particular term, it's probably easiest to make a new data file for each term and set these dates accordingly.
2. Course Information
Here you use the text field to enter the courses, subjects or blocks of time that you want to schedule. You can remove courses entered by mistake using the '-' button below the list of entered classes
3. I Teach Classes On The Following Days Of The Week
Most teachers use the default settings that allow classes to meet on Monday through Friday. If you work part time or want to schedule weekend activities, please use the checkboxes accordingly. This setting cannot be modified after creating your data file.
4. Choose the Type Of Schedule That Matches How You Teach
Planbook easily handles 4 different types of schedules. If you have a rotating schedule (either an A/B block or a multi-day rotation), please choose the appropriate option. Planbook supports 3-14 day rotating schedules in addition to an A/B block. There are also options for teachers who teach the same classes every single day and teachers who repeat weekly but change on a daily basis (elementary teachers often choose this option).
Next Steps
If you teach the same thing every day, your setup process is done. If you are on a weekly repeating or rotating schedule, you'll also need to assign courses to the days that you teach.
Either way, please press the continue button after entering the settings appropriate to your needs.
If you teach the same thing every day, you might be interested in Setting the Meeting Times For Your Classes or jumping right to Entering Lesson Plans.
Otherwise, keep reading for details about assigning classes to your schedule.
Assigning Courses to the Days You Teach
If you are using a rotating or weekly repeating schedule, you'll also need to pick the classes that meet on each day of your rotation. After pressing the continue button, you'll see a new screen allowing you to assign courses to the days you teach.
The grid shown above is used to assign classes to the days you teach. Simply toggle the checkboxes to reflect which classes you teach on a given day. After assigning your classes, click the Create Planbook button to begin planning. If you make a mistake in this section (or your administrator makes last minutes changes to your schedule), it can easily be corrected later.
Next, you'll probably be interested in Setting the Meeting Times For Your Classes or jumping right to Entering Lesson Plans.

