Planbook 3.0 User Guide
Planbook 3 for Mac User Guide
Planbook 3.0 is a major update that brings many new features, lots of bug fixes and unifies the user experience to match that of many other Mac apps. Planbook 3.0 data files are fully compatible with those created in 2.x so the same file can be edited using the previous or current versions of the program. As always, please be sure to have a backup system in place in case something goes wrong with your computer.
Below is a list of the new features and major bug fixes found in Planbook:
System Requirements for Planbook 3.0
Planbook 3.0 requires:
- An Intel Mac (not a PowerPC)
- OS X 10.5+
If you are using a PowerPC or running Mac OS 10.4, the last compatible version of Planbook can be found at: http://www.hellmansoft.com/files/planbook264000.zip
New Features in 3.0
Planbook 3.0.1 and 3.0.2 have also been released. The fixes/changes in these releases can be found below or by following these links: 3.0.1 | 3.0.2
Main View Features
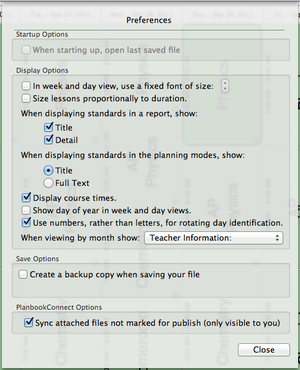
- There's a new preference to give lessons amounts of space in the Week/Day view proportional to their length.
- Left side sidebar revamped, courses expand to show units in the outline view. Looks much more "Mac" like.
- The inspector has been removed, replaced by the new right side sidebar view that's accessible by clicking the gear icon in every day/week view lesson.
- The lesson views in the day and week view now show the entirety of entered information and can be scrolled.
- Assignments can now be managed from the Full Screen Editing Mode.
Scheduling Features
- You can now remove a course from a day (from the "gear" sidebar).
- You can now quickly add a section of a course on a single day (from the gear sidebar).
- You can now (on rotating schedules) add a class to every day of the week outside of your rotation. So, if you're on an A/B schedule but have Homeroom every single wednesday, regardless of rotation day, you can do that.
- You can now add a course to a subset of the duration of the planbook file.
Library Features
- Lessons in the library are now universal to all files on that computer.
Copy/Paste Features
- You can now drag a lesson from one open planbook file into another open planbook file.
- You can now copy and paste lessons from one Planbook file to another open Planbook file.
Lion Only Features
- There's a full screen mode for Lion users.
- The Lion version automatically reopens all your files that were open when you last closed the application.
Unit Features
- Lessons may be dragged from the day or week view onto the units in the sidebar to assign that lesson to a unit.
- The Units manager now lists the standards used in a unit.
- Units may now be exported and imported.
- Exporting a unit is done via the Tools-->Unit Manager menu item.
- Importing a unit is done via the File-->Import Lessons menu item.
Report Features
- All the reports can now be instantly emailed from Planbook (using the new "Send as Email" button). This only works if you use Apple Mail as your email client.
- All the reports can now be instantly saved as a PDF from Planbook (using the new "Save as PDF" button).
- Some formatting improvements, mostly to the non-weekly reports.
iCal Features
- You can now select (from the Tools-->iCal Manager) which calendar each course should sync to. This includes networked calendars.
Publishing Features
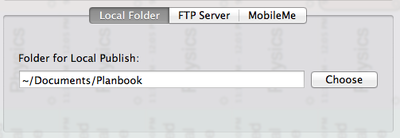
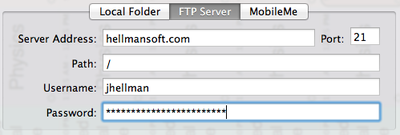
- Assignments (and their files/links) are published via Local, FTP or MobileMe publishing.
Improvements
- Standards are no longer applied to a lesson by dragging from one table to another. Just check a box and its applied.
- Custom days can now be named (when created)
- Custom days can now be reused as needed saving the need to re-enter the custom schedules you've created.
- Importing and exporting can now be done for a range of dates within a course (rather than only the entire course).
- Time entry is now greatly simplified- no more 24 hr time. Planbook interprets any 1-4 digit time and determines AM or PM automatically (and intelligently, hopefully).
- The Scrolling list of lessons at the top of the screen in full screen editing mode has better formatting.
- The search results table is now hidden until you search
- Custom days are now created non-destructively (that is, if you convert a day to a custom one and you've already got lesson information in a lesson that will remain in the custom day, it's preserved).
- The file extension for attachments now shows in the table view.
Bug Fixes in 3.0
- Importing and exporting now includes assignments
- The eSellerate Engine is updated and will hopefully behave better.
- Fixed issues when adding courses to rotating schedules.
- Many, Many more.
Fixes and Features of Planbook 3.0.1 (30100)
- Fixed Day Numbers not showing in the header buttons.
- Fixed Preference for Proportional Lesson Lengths.
- Fixed display of checkboxes in the left sidebar.
- The size of the sidebars (left and right) is remembered so you can have them take as much (or little) space as you'd like.
- Fixed issue where, after entering lesson text, only part of the lesson view refreshed.
- Added ability to remove library lessons.
- Fixed issue where courses couldn't be changed in the lesson reports.
- Sync information window doesn't reflect the correct corner of the screen.
- Fixed incorrect dates on monthly calendars when published.
- Improved report formatting (minimal).
- Hide print/email buttons on OS X 10.5 (These features require 10.6+).
- Fixed issue with end times not being changed as directed.
- Improved display for Lion users who have chosen changed from the default behavior and have Lion :#always:# display scroll bars.
Fixes and Features of Planbook 3.0.2 (30200)
- Fixed (again) reports not updating as courses are changed.
- Greatly speeds up text input in the day and week views.
- Custom days adopt names and times when reusing an old custom day.
Fixes and Features of Planbook 3.0.3 (303000)
- Library lessons can now have their titles changed
- Library can now be searched (only by title)
- Improved formatting of the weekly report when not showing the course times
- Fixed issues with the tag report
- Added preference to enable scrolling on OS 10.5, 10.6. I don't like how this looks aesthetically, but it's a useful feature. Scrolling is off by default.
- fixed time entry issues
- Fixed issue where reports couldn't be emailed or printed on some computers.
- Shrank the minimum size of the app to allow a smaller window
- Decreased the font size of the Title and Course name in the Day/Week view to allow more lesson information to be displayed.
- Prevented a problem where leaving a lesson field title blank could prevent saving.
Fixes in 3.0.3
- Fixed odd display issues when bumping lessons.
- Fixed inability to open the "Assign Course Times" menu item.
Fixed in 3.0.3
- Fixed issues opening Standards Report
- Window now remembers sidebar and notes view sizes
- Planbook opens, by default, to the standard lesson fields.
Fixed in 3.0.5 (305000)
- Improved assigning of lessons to units and the unit report.
- Fixed issue where courses weren't refreshed in the reports when changing.
- Issue where notes might not been permanently removed when deleting them has been fixed.
- Improves display of times in the lesson views.
- Fixed issue on Snow Leopard where the course name sidebar might not expand.
How to Get More Help
If, after perusing these help pages, you're unable to solve your problem or figure something out there are a number of other ways you can get help regarding Planbook for Mac.
- Yahoo Group for Planbook - Join the group and get help from Jeff (the developer of Planbook) and a large group of peers who are members.
- Facebook page for Planbook - Like the Facebook page and you can get help from Jeff (the developer) and a different group of peers who are on Facebook.
- Planbook Twitter account - Not the greatest for detailed support, but fast for quick questions.
- Email - Contact Jeff via direct email. It try to get back to emails within 24hrs.
Getting Started with Planbook
Launching Planbook for the First Time
Planbook is much like Microsoft Word, Apple's Pages and other programs that create documents. The information for your classes is stored within a data file. The first time that you use the Planbook application, you will be asked to create a new planbook data file. While you can correct any mistakes you make later, it's easiest to carefully enter the particulars about your schedule when getting started.
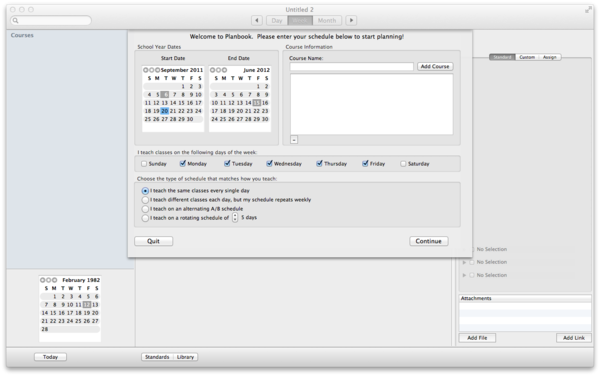
Upon launching Planbook, you will be presented with the following window.
You'll notice four areas that require your attention.
1. School Year Dates
The two calendars at the top left determine the range of dates available for lesson planning. People often choose to have a single planbook file for an entire school year, but if your schedule changes significantly at the end of a particular term, it's probably easiest to make a new data file for each term and set these dates accordingly.
2. Course Information
Here you use the text field to enter the courses, subjects or blocks of time that you want to schedule. You can remove courses entered by mistake using the '-' button below the list of entered classes
3. I Teach Classes On The Following Days Of The Week
Most teachers use the default settings that allow classes to meet on Monday through Friday. If you work part time or want to schedule weekend activities, please use the checkboxes accordingly. This setting cannot be modified after creating your data file.
4. Choose the Type Of Schedule That Matches How You Teach
Planbook easily handles 4 different types of schedules. If you have a rotating schedule (either an A/B block or a multi-day rotation), please choose the appropriate option. Planbook supports 3-14 day rotating schedules in addition to an A/B block. There are also options for teachers who teach the same classes every single day and teachers who repeat weekly but change on a daily basis (elementary teachers often choose this option).
Next Steps
If you teach the same thing every day, your setup process is done. If you are on a weekly repeating or rotating schedule, you'll also need to assign courses to the days that you teach.
Either way, please press the continue button after entering the settings appropriate to your needs.
If you teach the same thing every day, you might be interested in Setting the Meeting Times For Your Classes or jumping right to Entering Lesson Plans.
Otherwise, keep reading for details about assigning classes to your schedule.
Assigning Courses to the Days You Teach
If you are using a rotating or weekly repeating schedule, you'll also need to pick the classes that meet on each day of your rotation. After pressing the continue button, you'll see a new screen allowing you to assign courses to the days you teach.
The grid shown above is used to assign classes to the days you teach. Simply toggle the checkboxes to reflect which classes you teach on a given day. After assigning your classes, click the Create Planbook button to begin planning. If you make a mistake in this section (or your administrator makes last minutes changes to your schedule), it can easily be corrected later.
Next, you'll probably be interested in Setting the Meeting Times For Your Classes or jumping right to Entering Lesson Plans. While not required, many teachers like to set the meeting times for their classes. This is especially important if you plan on syncing your lessons to iCal. There are several ways to set meeting times, but we'll start with the most flexible.
Using the Schedule Menu to set Meeting Times
The easiest way to assign times to your classes is to use the Schedule-->Assign Course Times menu item.
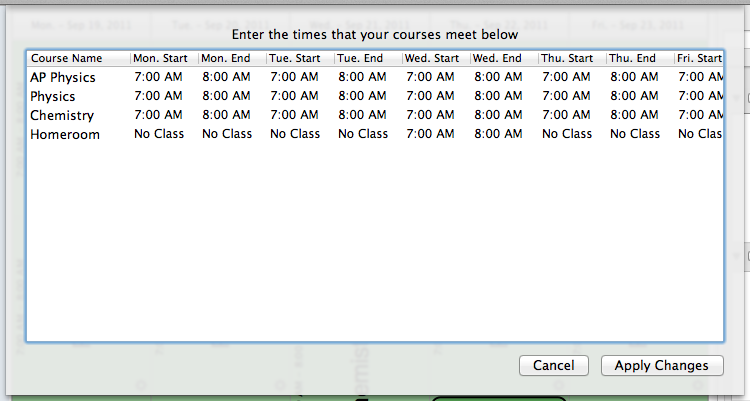
Upon selecting the menu item, you'll be presented with a window showing your classes and the days that they meet.
You can click on any time and type a new time to make changes. Planbook 3.0 is much more flexible in the time formats it accepts. You can enter 12 or 24 hour time and Planbook is now smart enough to parse entries like 9, 10 or 130 properly as 9:00 am, 10:00 am and 1:30 pm respectively. If you need to force Planbook to use 9 pm rather than the default of 9 am, simply write 9p.
You'll notice that classes that don't meet on a particular day are shown as no class and this can't be edited. If you need to completely add or remove a course from your schedule, please read up on adding and removing courses from your schedule.
Using the Settings pane to adjust course times
The schedule menu only allows for changing all of the meeting times for a given class. Teachers are always adjusting schedules to accommodate assemblies, field trips and other events that impact our days. Planbook can also help with this.To modify the meeting time for a single instance of a class you'll first need to locate the lesson in question. Once located, click the small gear icon at the bottom right of the lesson plan view (as indicated to the left).
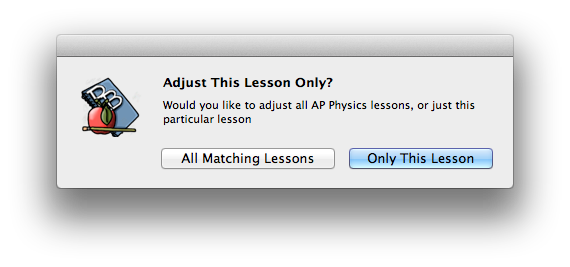
Once you've clicked on the gear icon, the lesson entry pane on the right side of the screen will shift to reveal a number of different settings that can be changed. To change the times for the course, we're interested only in the Start Time and End Time text fields.Once you change the time that this class meets, a you will be presented with a dialog box asking if you'd like to change this lesson only, or all lessons like it. Click the appropriate button to make your choice. If you choose to change only that lesson, the day containing that lesson will become a custom day.
The bulk of work that you do in Planbook centers on entering lesson information. This page will focus on entering the text components of your lesson plans. Other sections focus on Creating Assignments and Attaching Files and Web Links to your Plans.
Selecting Lessons To Edit
Selecting the lesson you want to edit is as simple as pointing at the lesson with your mouse cursor and clicking on it once (avoiding the small gear to at the bottom right of the lesson). Once you've clicked once on the lesson, the sidebar on the right will update to reflect the information found in the selected lesson.
Once a lesson is selected, you will see it outlined in black in the main view. You'll also notice the right side sidebar shows the name of the class and the day it's meeting.
Editing Lesson Information
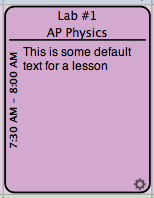
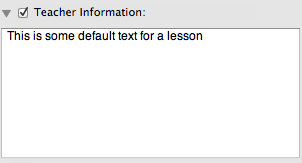
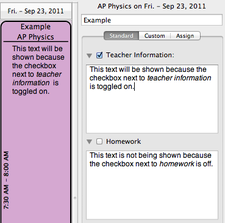
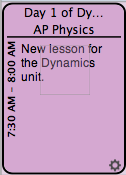
Planbook offers 6 different text fields for text entry, plus the lesson title field. The images to the left show the results of entering a title for the lesson (shown on the right). Note that the color of the lesson in the main view darkens and the lesson title is shown at the top of the lesson view.The lesson view also shows the text entered into the lesson fields. You can control which fields are displayed in the lesson view using the checkboxes next to the field name. Toggle off the field to prevent its display in the lesson view. Toggle the field on to display it. These checkboxes do not affect publishing or syncing to [PlanbookConnect] or iCal.
In addition to the 3 standard fields (Teacher Information, Homework and Public Information), Planbook now includes 3 more fields in the "Custom" tab.
A new feature in Planbook 3 is that the text displayed in the lesson view can be scrolled. To scroll text that extends beyond the view, simply use the two finger scrolling gesture built into OS X to scroll up and down.
Planbook also offers a detail mode for entering lesson information into larger text boxes.
Changing the Field Names
Planbook uses default field names (Teacher Information, Homework, Public Information, Custom 1, 2 and 3) but you can, of course, easily change these to meet your needs. The idea behind the first three fields is that teachers who choose to publish or use PlanbookConnect might have information they want available to them, but not their students. Hence, the Teacher and Public information fields. The teacher field could be kept private while sharing the public field. The homework field is for teachers who just want to jot down homework assignments and not go through the process of Creating Assignments. The custom fields are designed to be changed.
To change a field, click once directly on the name of the field (shown below). Then, type your new field name and hit enter. This change will apply to all lessons- field names are universal, not specific to a single lesson.
Planbook offers a Detail mode for editing lessons. The benefits of this mode are a larger set of text boxes for lesson entry as well as a nifty mechanism for sequentially navigating through an entire course or unit of lessons.
There are three ways to enter the detail mode:
- Double Click a Lesson View from the Day, Week or Month views.
- Use the View-->Detail Mode menu item (or keyboard shortcut - Command + Shift + L).
- Click on a unit name in the left side sidebar (read more about units).
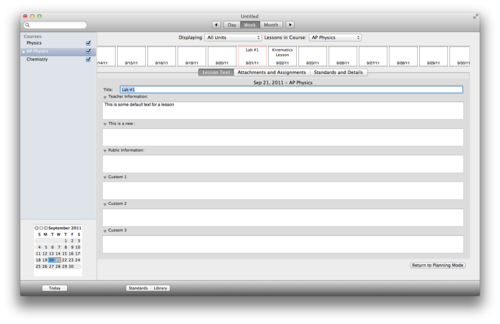
Once you have entered Detail mode, you'll see a screen similar to the one below:
Detail Mode Overview
At the top of the detail mode, you'll see a horizontally scrolling list of lessons found in the selected course. You can click any of these lessons to select it and you'll notice the selected lesson is outlined in red.
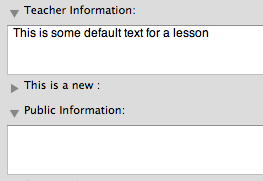
Below the scrolling list of lessons, you'll see a similar set of text fields. You can edit the lesson title and all other text fields from this view. You can also give yourself more space to edit by hiding unused fields. To hide an unused field, click the disclosure triange (►). The fields will automatically resize as you show and hide fields.
Editing text from the detail mode is otherwise identical to the methods found in the Planning Mode
Changing the Course or Unit Displayed
You can easily change the course that's being displayed using the pop up menu at the top of the Detail mode. Changing the course will result in all of the lessons in the newly selected course being available in the scrolling view at the top of the screen.
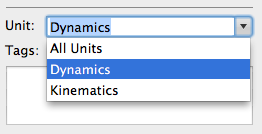
Changing the selected unit will result in only the lessons added to a particular unit being available in the top scrolling view.
Assignments, Attachments, Standards and Lesson Details
The Detail mode can also be used to create assignments, attach files and web links, apply standards to a lesson, add a lesson to a unit or tag lessons.
Return to Planning Mode
You can exit the detail mode and return to planning mode using either of these two methods
Overview
In addition to the text fields available for lesson entry, Planbook also offers the ability to create assignments. Assignments in Planbook differ from text boxes in that assignments:- Have an assigned date and a due date. The assignment appears attached to both the assigned and due lessons.
- Have an assignment title (the name of the assignment).
- Can have details about the assignment such as the pages to read or problems to work.
- Can have files and web links attached.
Creating a New Assignment
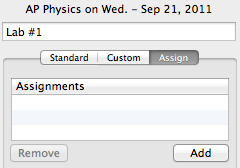
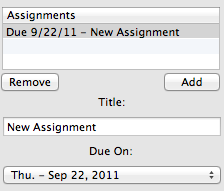
To create a new assignment, please first select the lesson to which you want to add the assignment. Remember that lessons are selected by clicking once on them in the Day, Week or Month view. Switch to the "Assign" tab (shown above). You will see an "Add" button. Clicking that button adds a new assignment to that lesson.New assignments have a default title of "New Assignment" and default to being due the next time the class happens. You can change the name of the assignment by editing the title field. A new due date may be selected using the pop up menu. Planbook allows you to set a due date 25 lessons in the future.
You can also edit the details, which are blank by default, by typing into the Details text area. Changes are saved instantly as you type.
Attaching Files and Web Links to an Assignment
Files (such as a worksheet, lab handout, etc...) and web links (references, source material, etc...) can be directly attached to an assignment. This is different than attaching files or links to a lesson. Assignment attachments *always* publish to [PlanbookConnect]. To attach files and links to an assignment, click the Add File or Add Link button. If you choose "Add File", you'll be presented with the standard Mac OS dialog for choosing files. If you choose "Add Link" you'll be presented with a window to enter a URL. Planbook does its best to find the name of the web page you attached (Internet connection required).Attachments may be removed from an assignment by right clicking on them and choosing "Remove Attachment". If you don't have a right mouse button, you can hold control and click on the attachment.
Removing an Assignment
Assignments can be removed by selecting them in the Assignments table and clicking the "Remove" button. The assignment will be removed from both the assigned and due lessons.
Assignments in the Day/Week View
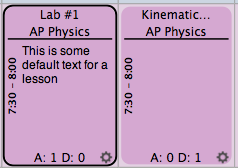
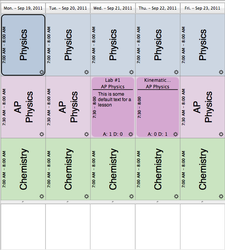
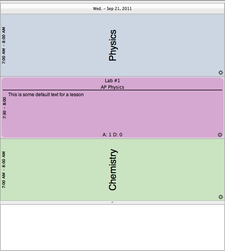
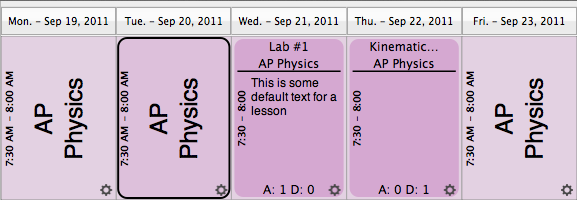
The lesson view in the Day and Week views show assignments that are assigned or due on a particular lesson. The number after the "A:" is the number of assignments assigned on a particular lesson. Similarly, the number after the "D:" tells the number of assignments due on that lesson. This is designed to give you a quick overview of what's going on during a particular lesson.
Managing Assignments from the Detail Mode
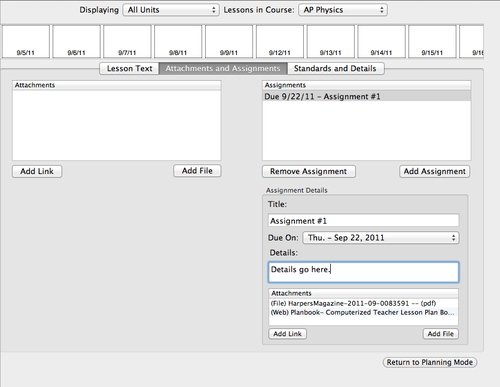
Assignments can be added, edited and removed in a manner similar to the method described above from the detail mode. The detail mode can be accessed by double clicking any lesson in the day, week or month views. The image below shows assignments as seen in the Detail mode.
Overview
You can attach files located on your computer or web links to sites on the Internet to the lesson plans you create in Planbook. These attachments can then be quickly opened by double clicking them. The idea is to organize your handouts and links in an intuitive way that helps you quickly access them during class.
Attachments can also be published to your web site or [PlanbookConnect]. You control which attachments are published using the "publish" setting unique to each attachment.
Attaching Files
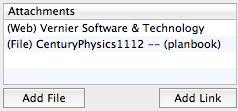
To attach a file to a lesson, click the "Add File" button found at the bottom left of the main window. This will bring up the standard Mac OS file chooser. Select the file (or files) to attach. That's it. The files you've chosen will now be linked directly to the lesson.
Attaching Web Links
To attach web links to a lesson, click the "Add Link" button and enter the URL (including http://) that you want to attach. Planbook will attach the link and attempt to determine the name of the web page you just attached.
Editing Attachment Name and Details
The name and details associated with an attachment cannot be edited from the Planning mode. In order to edit attachments, please enter the Detail mode by double clicking the lesson in the day, week or month view.
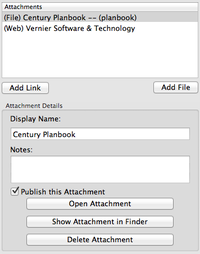
Once you've entered the Detail mode, click the "Assignments and Attachments" tab. You'll be presented with a view that shows all your attachments and allows you to change their name and provide notes about the attachment. You can also open the attachment, delete it or (in the case of local files) reveal the file in the Mac OS Finder.
Editing the Publish Settings for an Attachment
If you choose to publish your lesson plans to your own website or [| PlanbookConnect], your attachments will be published, too. This is often not ideal- for example, you probably don't want to publish tests or answer keys, but you might want them attached to your lesson plans. You can control which attachments are published toggling the "Publish This Attachment" checkbox off. If you toggle off this checkbox:
- The attachment will not be published to your own website, MobileMe, or via FTP.
- The attachment will be published to PlanbookConnect, but will only be viewable and downloadable when the user associated with your account is logged in. Guests and other PlanbookConnect users can not access this file.
Removing Attachments
If you no longer want an attachment connected to your lesson plans, you can easily remove the attachment by right clicking (holding control while clicking normally) on the attachment in the Planning mode. You can also remove an attachment using the delete attachment button found in the Detail mode.
When removing the file attachment from a lesson plan, the original file will not be removed.
A Note About File Attachments
Planbook does not copy or embed files that you attach to lesson plans. If you move a file that has been attached to a lesson plan, Planbook will no longer find it. If you open your Planbook data file on another computer, it will not find the files you've attached. There is a workaround for this, but it requires using [Dropbox] and ensuring that you have the same user name on all the computers you use. For more information, please check out information about using Planbook and Dropbox.
Overview
Planbook offers a day, week and month mode for for viewing and selecting your lesson plans. These modes can be toggled using the toggle button at the top of the main planbook window, or by using keyboard commands. Day and Week mode also be toggled by clicking the button at the top of every day that shows the date.
Week Mode
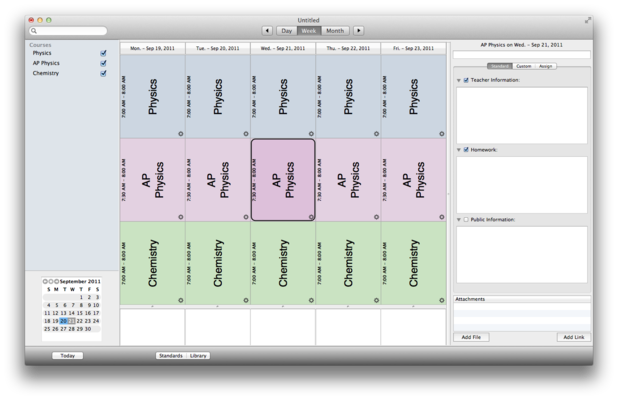
Planbook defaults to week mode when opening a new or existing file. This mode allows you to see an overview of all the days you teach in a single week.
Week mode can be enabled by setting the toggle button found at the top of the screen to the Week setting. You can also enable week mode with the View-->By Week menu item or the command-shift-W keyboard shortcut.
If you are viewing your plans in day mode, you can easily return to week mode by clicking the button listing the date at the top of the day.
The image to the left shows a version of the week view for an example file. Note that the currently selected lesson is designated with a black outline. Lessons with information entered into them are shown in a darker variant of the color you selected for that class. Also, note the existence of the text boxes at the bottom of every day. These text entry areas are designed to hold meeting information, reminders or other important information specific to that day that doesn't belong in a lesson plan.
The daily notes text areas may be resized by dragging the divider between the text area and the lesson views up or down. All the notes views resize synchronously.Day Mode
Day mode is a useful view for focusing on a single day's lessons. Viewing in Day mode also gives each lesson view more space, enabling more of the entered lesson text to be visible in each lesson view.
Day mode can be enabled by switching the toggle button at the top of the screen to day. You can also enter Day mode using the View-->By Day menu item or its associated keyboard shortcut- command-shift-D. You can also switch to day mode from week mode by clicking the button (that lists the date) at the top of any day.
You can easily switch back to week mode by clicking the date button at the top of the view.
The image to the left shows an example of Day mode. Notice that all of the classes have expanded to fill the available space. Lessons with text entered still register in a darker, more opaque way. The notes field below the day has also expanded and allows the viewing and entering of longer blocks of text without scrolling.
The notes view can also be resized by dragging the divider just above it. Upon shifting back to Week mode, all the notes views will adopt the new size.
Month Mode
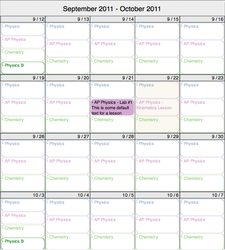
Planbook also features a Month mode which, in the interests of precision, is actually a four week view. This mode is nice for getting an overview of your lessons over a long period of time.
You can enter the month mode either by clicking the Month section of the toggle button at the top of the screen or by using the View-->By Month menu item (or its associated keyboard shortcut command-shift-M.
Month mode, due to the density of information being displayed, behaves a little differently from the other modes. The selected lesson is the only lesson with an opaque, deeply colored, background. Today's lessons are indicated with a slightly different background color.
The label at the top of the Month mode shows the month (or months) that are currently displayed.
The daily notes fields are inaccessible from this mode.
The settings panel is also inacessible from this mode.
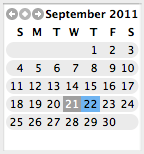
The most common way to navigate through your calendar is to use the calendar control at the bottom left corner of the Planbook window (shown to the right). This calendar allows you to quickly shift to any date in your data file by clicking directly on the number representing the day you'd like to view.
The forward and back arrows next to the month name enable you to select dates in a different month.
If you select a date after your calendar ends, you'll be taken to the last day in your file.
If you select a date before you calendar starts, you'll be taken to the first day of your file.
In addition to navigation with the lower-left calendar, it's also possible to use the forward and back arrow buttons located next to the Day/Week/Month toggle buttons.
The forward and back arrows change their behavior depending on the context.
- When in Day mode, the arrows advance or retreat a single day at a time.
- When in Week mode, the arrows advance or retreat one week at a time.
- When in Month mode, the arrows also advance or retreat by a single week. Todo: preference to change this behavior and have the arrows advance or retreat by four weeks.
It's also possible to navigate your file using menu items found in the View menu. The Go Forward and Go Backward menu items have the exact same context sensitive behavior associated with navigating using the forward and back arrows.
It is also possible to move forward or backward using keyboard shortcuts.
- The shortcut command-ctrl-right arrow will move you ahead as described in navigating using the forward and back arrows.
- The shortcut command-ctrl-left arrow will move you back as described in navigating using the forward and back arrows.
Jumping to a Specific Date
Planbook also offers the ability to jump to a particular date. Again, using the View menu, it's possible to navigate directly to today or to a specific date you choose. There are also keyboard shortcuts designed to let you navigate without taking your hands off the keyboard.- Use the View-->Go To Today menu item to navigate directly to today's lessons. If you use this command on a day not included in your calendar (a Saturday, for example), you'll be taken to the nearest day.
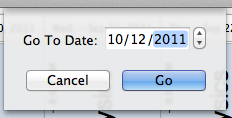
- Use the "View-->Go To Date menu item and you'll be presented with a pop up dialog into which a new date may be entered.
There are keyboard shortcuts for both of these commands as well. Command-Shift-T takes you to today's lessons. Command-Shift-Y brings up the Go To Date dialog. Planbook offers a Detail mode for editing lessons. The benefits of this mode are a larger set of text boxes for lesson entry as well as a nifty mechanism for sequentially navigating through an entire course or unit of lessons.
There are three ways to enter the detail mode:
- Double Click a Lesson View from the Day, Week or Month views.
- Use the View-->Detail Mode menu item (or keyboard shortcut - Command + Shift + L).
- Click on a unit name in the left side sidebar (read more about units).
Once you have entered Detail mode, you'll see a screen similar to the one below:
Detail Mode Overview
At the top of the detail mode, you'll see a horizontally scrolling list of lessons found in the selected course. You can click any of these lessons to select it and you'll notice the selected lesson is outlined in red.
Below the scrolling list of lessons, you'll see a similar set of text fields. You can edit the lesson title and all other text fields from this view. You can also give yourself more space to edit by hiding unused fields. To hide an unused field, click the disclosure triange (►). The fields will automatically resize as you show and hide fields.
Editing text from the detail mode is otherwise identical to the methods found in the Planning Mode
Changing the Course or Unit Displayed
You can easily change the course that's being displayed using the pop up menu at the top of the Detail mode. Changing the course will result in all of the lessons in the newly selected course being available in the scrolling view at the top of the screen.
Changing the selected unit will result in only the lessons added to a particular unit being available in the top scrolling view.
Assignments, Attachments, Standards and Lesson Details
The Detail mode can also be used to create assignments, attach files and web links, apply standards to a lesson, add a lesson to a unit or tag lessons.
Return to Planning Mode
You can exit the detail mode and return to planning mode using either of these two methods
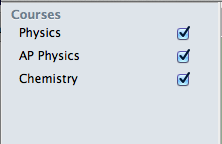
The main Planbook can quickly become crowded if you teach many different classes per day. Planbook enables you to show and hide courses to de-clutter the interface and allow each remaining lesson to display more information.
To show and hide courses, simply toggle the checkbox next to the course name as shown below.
Toggling the display of courses affects not only the display of courses in the main Planbook views (Day/Week/Month modes) but also the PDF, Emailed and Printed Reports.
Choosing What to Show in the Day and Week Modes
To choose the fields that are displayed in the lesson views in Day and Week mode, you can toggle on and off the checkboxes next to the field names in the right side sidebar. The image below to the right shows the impact of toggling fields on and off.
Toggling lesson fields on and off in this manner does not impact the Month mode, nor does it affect the PDF, e-mailed or printed reports.
Choosing Which Field to Show in Month Mode
Choosing the field to show (if possible) in Month mode is different than the mechanism for choosing fields in the Day and Week mode. To choose a field to show in the Month Mode:
- Open the Planbook Preferences using the Planbook-->Preferences menu item
- Select the field to show using the When Viewing By Month Show preference (as shown below)
The Month mode often becomes too crowded to show information beyond the course name. If, and only if, room is available will the field you've selected be shown.
Adjusting Your Schedule
Managing your Lessons and Days
Overview
Planbook has the ability to easily adjust your lessons to deal with unforeseen events, assemblies or other changes to you schedule. Planbook can cancel entire school days, change the schedule on a specific day, and deal with long term vacations. But, right now, we're going to look at the simplest schedule change- moving a lesson forward or backward.
Bumping Lessons
Sometimes lessons take longer than expected, a guest speaker suddenly becomes available, or a large segment of your class gets pulled out of class for standardized testing. In these cases, you probably want to push your scheduled lessons ahead and insert a new lesson plan. Bumping lessons can be done in a number of ways:
- Click on the gear icon in the bottom right corner of the lesson view (day/week view). Then, click the "Bump" button.
- Right click (hold control and click if you don't have a right mouse button) and choose "Bump Lesson".
Bumping a lesson pushes the lesson you selected forward to the next time that course or subject meets (skipping days as necessary). It also pushes all the subsequent lessons ahead by one day to make room for the bumped lesson. If you have a lesson entered on the last day that a course meets, that lesson will be bumped out of your Planbook and removed.
Pulling Lessons Back
Pulling a lesson back is the exact opposite of bumping. If you select the pull lesson back option on a lesson view, all the subsequent lessons will be pulled back by one course meeting. The lesson you chose to pull back will be overwritten.
You can pull lessons back using the same methods used for bumping lessons.
- Click the gear icon in the bottom right corner of the lesson view (day/week view). Then, click the "Pull Back" button.
- Right Click (hold control and click if you don't have a right mouse button) and choose "Pull Lesson Back"
When you need to remove a day (or series of days) from your Planbook file for a vacation, holiday or snow day, Planbook can help. Planbook enables to you easily pull a day out of your planner and gives you options to delete or bump the lessons you've already written. Users with rotating schedules can choose how the no-school day impacts their rotating schedule.
Creating a Non-School Day
There are three ways you can create a non school day.
- Click the gear icon to bring up the settings pane and choose "Make Non School Day"
- Right click (or hold control and click normally) on a lesson and choose "Make Non School Day"
- Select the Schedule-->Make Non School Day menu item.
All three methods are identical.
Weekly Repeating or Same Thing Every Day Schedules
If you teach the same thing each day or work with a weekly repeating schedule, the process for making non school days is simplified. After using one of the methods above to start creating a non school day, you will be presented with a dialog box that allows you to specify how to deal with the pre-existing lessons.
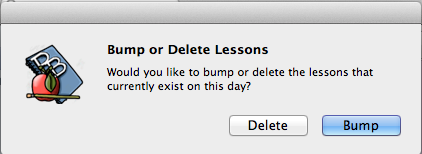
Choosing the bump option will result in the existing lessons being pushed ahead before the day is made into a non-school day. If you choose the delete option, the lessons will also be deleted, along with the entire day.
Rotating or A/B Block Schedules
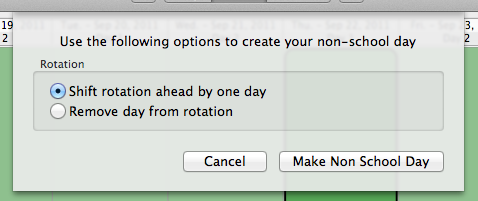
When using a rotating block schedule, it's important to ensure that your rotation is dealt with appropriately when making non school days. When you use any of the methods listed above to make a non-school day in a rotating schedule, you'll be presented with an extra dialog asking how to deal with the rotation.
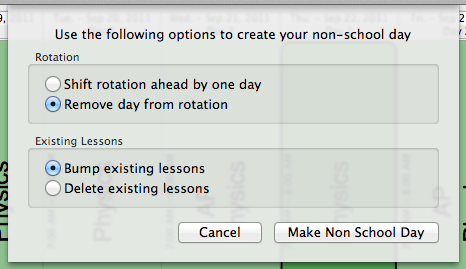
This dialog will enable you to choose whether to completely remove that day from the rotation, or shift the rotation ahead by one day. Consider the images below to see the effect of the two options. In both cases, Thursday Sept. 22nd was turned into a non-school day.
If you choose the Remove Day from Rotation option, you will also need to choose how to handle existing lessons on that day. Planbook will provide another set of buttons to help you out.Changing the Name of a Non-School Day
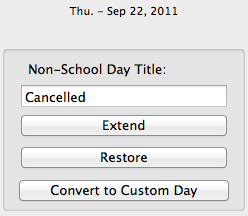
Planbook 3.0 makes it easy to change the name of a non-school day. To change the name of a non school day, simply click any place on the non school day. You'll notice the right sidebar change to reflect the options available for non-school days.You can easily change the name of the non-school day by typing in the Non-School Day Title field. Your changes are instantly used to update the Non-School Day Name.
Creating Longer Breaks and Vacations
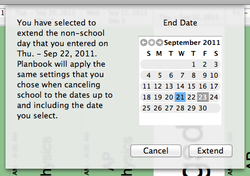
Creating multi-day breaks and vacations is also easy with Planbook. You'll start the process for creating a longer break the same way you create a single non-school day. After creating a single non-school day, you can use the "Extend" button found in the holiday settings to lengthen the break.
When you click the extend button, a window will pop up asking you for an end date for the break. Choose the appropriate date by clicking on the actual number representing the date and you'll have a long vacation created almost instantly.
Please note that, for rotating schedules, the settings you chose for the original non-school day regarding shifting the rotation will carry through the entire extended break.
Restoring Non-School Days
Non-School days can quickly be converted back to normal school days by clicking on the day and then clicking the "Restore" button.
Converting a Non-School Day to a Custom Day
Planbook allows custom schools days (days with unique schedules such as assembly schedules). You can quickly convert a non-school day into a custom day using the "Convert to Custom Day" button. More information is available about Using Custom Days. While we'd love for our schedules to follow a predictable, repeatable pattern, we all know that sometimes schedules change. Planbook features the ability to create Custom Days to deal with assembly schedules, half days, and anything else your school can throw at you.
Creating a Custom Day
To create a custom day in Planbook, you have two options
- Use the Schedule-->Convert To-->Custom Day menu item
- Use the Convert To Custom button found in the settings pane after clicking the gear in lower right corner of a lesson
Weekly Repeating and Same Thing Everyday Schedules
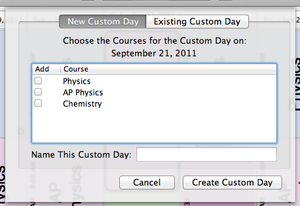
When you use a Weekly Repeating or Same Thing Everyday schedule in Planbook, your selected day is automatically converted to a custom day. Regardless of the method you use to convert a day into a custom day you'll have the option to select the courses that should meet on a custom day. You can also name your custom day to enable its easy reuse later in the year.Rotating and A/B Block Schedules
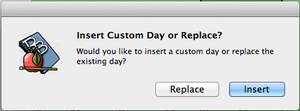
If you use a rotating or A/B block schedule, you might need to insert a custom day (shifting the rotation ahead without losing any days). Planbook enables this by asking you how to handle the new Custom day when you try and create it.
If you choose to insert your custom day, a new day will be inserted into your schedule and the day previously occupying that space in your calendar will be shifted ahead by one day. If you choose to replace, the day will be removed from your rotation. The screenshots below illustrate the impact of this choice.
Setting the Times for Lessons on Custom Days
Any new class that you add to a custom day will meet, by default, starting at the time you made the custom day and lasting for exactly one hour. This probably isn't what you want. To change the time for a lesson you'll want to:
- Bring up the settings pane in the right side sidebar by clicking on the small gear icon in the lower right corner of the lesson view.
- Modify the start and end time for your lesson using the text boxes. Planbook parses almost any time you enter; no need to enter 24 hour time anymore (but, you can if you'd like).
- Changes you make to the times for a custom lesson apply only to that lesson.
Reusing Custom Days
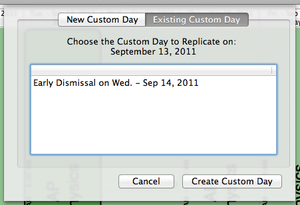
For custom days that occur frequently, Planbook 3.0 introduces a feature to allow the reuse of custom days. To reuse a custom day, go through the process of creating a custom day as described above.
Once you have the dialog box open asking you to select the courses for your new day, switch to the "Existing Custom Day" tab. You'll see a list all the custom days you've already entered. You can now select one of the days and apply it to custom day you're trying to make.
Planbook will list each of the named custom days you've already used (listing custom days used multiple times only once).
Planbook will do its best to retain existing lesson information on days designate to become custom. For example, if you've already planned a lesson in your Physics class but later convert the day to a custom day that includes a Physics lesson, the existing lesson will not be deleted and recreated. The information you've entered will remain.
Other Ways Custom Days Are Created
In addition to the manual mechanism for creating custom days described above, Planbook will sometimes convert a day to a custom day automatically based on changes that you make. Instances where a day will be automatically converted include:
- Adding a course to a single day
- Removing a course from a single day
- Changing the time for a single lesson on a day and not applying those changes throughout the file
- Adding a course to a specific day of the week (when using rotating schedules). For example, adding a homeroom class to every single Tuesday when your normal schedule is an A/B rotating schedule.
- Adding a course to a subset of the days in your schedule. For example, adding a course to all the days in September when your file continues into January
Overview
Planbook gives you the opportunity to set dates for your calendar when creating your Planbook file. Sometimes, things change. For example, snow days extend a school year. Planbook now has features to let you modify your existing calendar without starting over.
Extending Your School Year
Planbook lets you extend your school year by one week at a time. Planbook does its best to match the extended days to your existing schedule. If you have a rotating or block schedule, you may need to convert days in the added week to match the new days with your schedule.
To extend the school year:
- Choose the Schedule-->Extend Year By One Week menu item
Inserting a Week at the Beginning of the Year
Similarly, Planbook can also insert a week before the current start of your file. Planbook again does its best to match the added days to your existing schedule but you may need to use the convert days feature to match the new days into your schedule.
To insert a week at the beginning of the year:
- Choose the Schedule-->Insert Week At Beginning of Year
After you've successfully used Planbook to write and store your lesson plans, it's easy to reuse those plans in your next school term or year.
Most commonly, a teacher might have a fall semester that runs from September through January. In late January, Winter/Spring term begins and the teacher might want to reuse the Fall plans in the new term. Planbook makes it very easy to shift the start date of your plans to accomodate a new term.
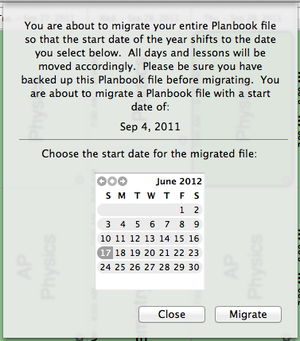
To move your Planbook so that it starts on a new date, please first select the Schedule-->Migrate To New Start Date menu item.
Once you've selected the Migrate menu item, a panel will appear asking you to select a new start date for the file. Using the calendar (which defaults to the last day of the term you've entered), you can select a new start date for the file. If you click Migrate, the file will be instantly moved so that it begins on the day you selected.It's highly recommended to save a new copy of your file (using the File-->Save As) menu item after migrating your file so you don't overwrite your old file.
Managing your Courses
Planbook allows you to add courses to your file after the initial setup process. Planbook allows you to:
- Add an existing course to days the class didn't previously meet.
- Add a new course to a day (or days) in your schedule.
- Add a course to a subset of the days in your file.
- Add a course to a fixed day of the week (even if your file is a rotating or block schedule).
- Add an existing course to a single day of your year.
Adding an Existing Course to New Days in your Schedule
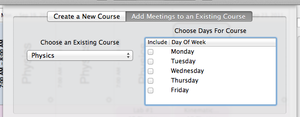
Regardless of the type of schedule you use, Planbook allows you to easily add an existing course to days that the course didn't previously meet. To add an existing course to new day, first use the Schedule-->Add Course menu item to bring up the Add Course window. Then, select the Add Meetings to an Existing Course tab.Once you have the window up as shown to the right, you can select the course you want to add from the pop up on the left. Then, use the checkboxes to assign the existing course to the days in your schedule. The example to the right shows either a Weekly Repeating or Same Thing Everyday schedule. If you have a rotating or block schedule, the table will show the days of your rotation rather than the days of the week (by default).
Adding an Existing Course When That Course Meets Already
Planbook does support multiple instances of a single class on a single type of day. To add an additional meeting for a class, follow the same steps listed above for Adding an Existing Course to New Days in your Schedule but select the day that the course already meets. Doing this will result in an additional meeting of that class.
There are some issues to consider before doing this.
- Publishing will not work properly with multiple meetings of a single class on a single type of day.
- Syncing to PlanbookConnect will not work properly with multiple meetings of a single class on a single type of day.
- If a day contains multiple instances of a class, those instances cannot be individually removed. All the instances of that course will be removed when removing courses.
If those caveats aren't acceptable, you'll want to create a new course with a different name (Physics AM and Physics PM, for example) and add the new course rather than repeating an existing course.
Adding a New Course to Your Schedule
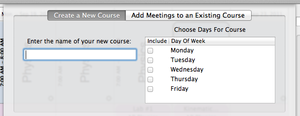
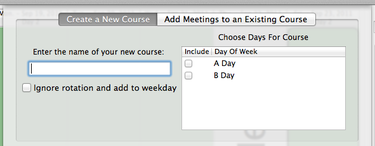
If you get assigned a new class to teach or find that you want to plan an additional activity, after-school program, or other block of time, you can easily add a completely new class to your plans.To add a new class to your schedule, first choose the Schedule-->Add Course menu item. You'll be presented with the add course window. Make sure you've got the create a new course tab selected as shown to the right.
Name the new class (note that this name must be unique in your file) and choose the days that you would like it to be added. The example to the right shows a weekly repeating schedule. Rotating and Block schedules will reflect the days of your rotation, rather than the days of the week.
Adding a Course to a Subset of the Days in your Schedule
Planbook 3 adds the ability to add a course to a range of dates in your calendar, rather than the entire calendar from beginning to end. This option is available for both adding completely new courses or adding an existing course to new days in your schedule. The Add Course window has a new section at the bottom (shown below) enables this feature.
Select the button next to from to add a course to a range of dates. The dates set, by default, to the full range of the calendar. You can change this to any set of dates.
Important Things to Remember When Adding Courses to a Range of Dates
Planbook treats classes added to a subset of days differently than other classes. Here's how these courses are treated differently.
- You will not be able to change the time of a course added to a subset of days from the Schedule-->Assign Course Times menu item. You must change times using the settings sidebar.
- You will not be able to remove the course added to a subset of days using the Schedule-->Remove Course menu item. You must remove the course using the settings sidebar. You will only be able to remove the course one day at a time.
Adding a Course to a Fixed Day of the Week When Using a Rotating Schedule
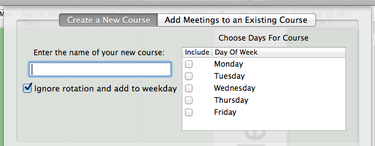
Occasionally, teachers want to add a course, activity or meeting to a fixed day of the week despite their normal schedule being a block or rotating schedule. Planbook 3.0 now supports this feature. If you use a rotating or block schedule and open the Schedule-->Add Course menu item, a new checkbox will appear. The screenshots below show the effect of toggling the checkbox for an A/B block schedule.
Important Things to Remember When Adding a Course to a Fixed Day of the Week
Adding courses to a day of the week turns all of those days into custom days. This means that:
- When adding courses to days of your rotation, custom days are excluded. If you added a course to every Tuesday, all of your Tuesday days will be excluded when adding courses to days in your rotation..
- You cannot change the times for all lessons on those custom days using the Schedule-->Assign Course Times menu item. You can change times for each lesson manually using the detail mode.
- When removing courses from days in your rotation, those courses will not be removed on those newly created custom days.
- There might be instances with creating non-school days where the schedule shifts. The course you added to a particular day of the week will shift as well.
Use of this feature is only recommended if you understand and can live with the consequences listed above.
Adding a Course to a Single Day of the Year
Adding a course to a single day of the year is the only course addition that's not made from the Schedule-->Assign Course Times menu item. Rather, to add a course to a single day:
- Click on the small gear icon found in a lesson on the day you'd like to add a course
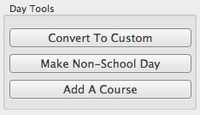
- Click the Add A Course button from the Day Tools section.
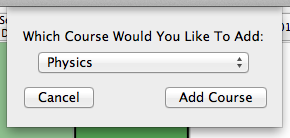
- Choose the course you'd like to add from the dialog that appears and click Add Course. The course will then be added.
The day to which you added a course will also be converted into a custom day.
Overview
Planbook also enables you to remove courses that you've added. You can remove a course from any day of the week or rotation to which its been added or remove it entirely. You can also remove a course from a single day.
Removing a Course From a Day of the Week
If you use a weekly rotating or same thing everyday schedule, you can choose to remove a course from any day of the week. To remove courses:
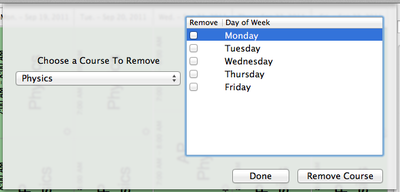
- Open the Remove Course dialog by choosing the Schedule-->Remove Course menu item.
- Select the day of the week from which the class should be removed and press Remove Course
The screenshot below shows the Remove Course window for a weekly repeating schedule. If the class meets only on a few days, the table will show only those days.
After you remove a course from the last day that it meets, the course itself will be completely removed.
Removing a Course From a Day in your Rotation
If you have a rotating or block schedule, Planbook lets you remove any course from the days in your rotation. To remove courses:
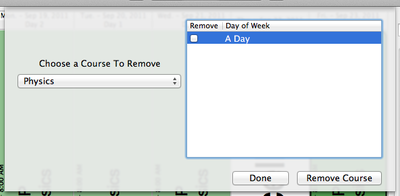
- Open the Remove Course dialog by choosing the Schedule-->Remove Course menu item.
- Select the day of your rotation from which the class should be removed and press Remove Course
The screenshot below shows the Remove Course window for an A/B block schedule. If the class meets only on a few days, the table will show only those days.
After you remove a course from the last day that it meets, the course itself will be completely removed.
Removing a Course From One Day of your Calendar
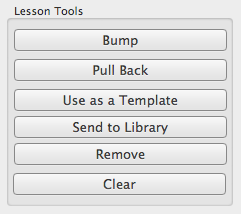
Planbook 3 also allow you to remove a course from a single day (not a single type of day) of your schedule. This feature is accessed through the settings pane (accessed by clicking the gear icon at the bottom right of any lesson view).
Once you have the settings pane open (shown to the right), the remove button may be used to remove that class from the selected day. No other days will be affected by this action.
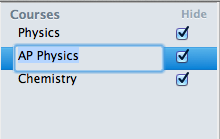
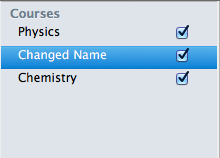
After removing the lesson, the day will be converted to a custom day. Classes in your Planbook file can be renamed by editing their display in the left side sidebar.
To edit your class names:
1. Be sure you're looking at your class names in the left side sidebar.
2. Double click the name of the course. The course name will change to an editable form.
3. Type your new course name and press the return key. The course name will change.
Tracking Standards
Overview
Before you can track standards using Planbook, you have to enter in all of the standards that you're interested in applying to lessons. There are two methods for entering standards into your Planbook data file.
- Manually enter each standard
- Import each standard from a CSV or plist file
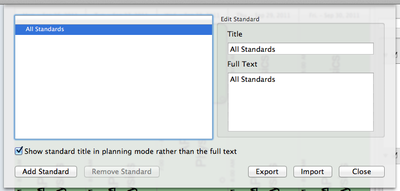
Instructions for each method are found below. Regardless of how you want to enter your standards, the process starts with opening Planbook's standards manager. This is done by selecting the Tools-->Standards Manager menu item.
Once you have opened the Standards Manager, you'll be presented with the window shown below.
Adding Standards Manually
Adding standards manually is an easy, if tedious, process. The process begins by pressing the ![]() button in the lower left corner. This will create a standard in your Planbook. The standard will be a substandard underneath the selected standard in the table view.
button in the lower left corner. This will create a standard in your Planbook. The standard will be a substandard underneath the selected standard in the table view.
New standards are added with a default title and detail. The title and full text can easily be edited simply by clicking on the fields to the right and typing (or pasting from a webpage, word document, etc...) into the field as appropriate. Standards are updated as you type- there's no need to save or press enter to lock in your information.
After updating the title, the table view will reflect the new name immediately. As the table sorts alphabetically, the table will also resort immediately.
There is no limit to the depth of your standards- any standard you've entered can become a parent standard for other standards. The images below show the process of selecting a standard to be the parent standard, adding a new sub-standard and then revealing that standard.
Removing Standards
If you add a standard by mistake, or just want to remove one of the standards you've entered, you can easily do this by selecting the standard you want to remove and pressing the ![]() button.
button.
Please note that removing a standard will:
- Remove all sub-standards of the selected standard.
- Remove the standard (and all sub-standards) from any lesson to which they were attached
Adding Standards From a CSV File
The other method to add standards to your Planbook file is to import them from a spreadsheet program such as Apple's Numbers, Microsoft Excel or even Google Docs. Standards imported into Planbook via a CSV file must adhere to a very specific format. That format is described now.
Importing Standards (No Sub-Standards)
If you want to import a single layer of standards where there are no substandards, you must set up a two column spreadsheet. That spreadsheet must take the form:
| Standard 1 Full Text | Standard 1 Title |
| Standard 2 Full Text | Standard 2 Title |
| Standard 3 Full Text | Standard 3 Title |
Please double check your spreadsheet to ensure that:
- There are no headers in your file (don't label your columns or rows)
- There are no empty columns to the right of your standards. Please select any extra columns to the right of your data and remove them.
Once you have your spreadsheet created, please see the section on converting your spreadsheet to a CSV format.
Importing Nested Standards
The Spreadsheet format you are required to replicate becomes more complicated if you are going to import nested standards. Rather than the two column spreadsheet described above, you must create a four column spreadsheet. The format of this spreadsheet should mimic:
| Standard 1 Full Text | Standard 1 Title | ||
| Standard 1 Full Text | Standard 1 Title | Standard 1.a Full Text | Standard 1.a Title |
| Standard 1 Full Text | Standard 1 Title | Standard 1.b Full Text | Standard 1.b Title |
| Standard 2 Full Text | Standard 2 Title | ||
| Standard 2 Full Text | Standard 2 Title | Standard 2.a Full Text | Standard 2.a Title |
| Standard 2 Full Text | Standard 2 Title | Standard 2.b Full Text | Standard 2.b Title |
| Standard 2.b Full Text | Standard 2.b Title | Standard 2.b.i Full Text | Standard 2.b.i Title |
After importing the standards listed above, a series of nested standards of the format shown below will be created.
- Standard 1
- Standard 1.a
- Standard 1.b
- Standard 2
- Standard 2.a
- Standard 2.b
- Standard 2.b.i
- Standard 1
Convert your Spreadsheet to a Comma-Separated-Value Format
Your standards cannot be imported directly from the default spreadsheet formats. You must export your spreadsheet as a comma-separated-value (CSV) file. This is a file format that is easily interchanged with other applications. To save/export your file in CSV format please choose the appropriate information for your spreadsheet program below:
- In Microsoft Excel, after creating your spreadsheet please do a "Save As" operation and select "CSV" as the format. Once you do this CSV save, you will need to open the file in Apple's TextEdit Application (in your Applications folder) and do a "Save As" again, selecting UTF-8 as the encoding for the file
-
- In Apple's Numbers application, after creating your spreadsheet, choose the File-->Export menu item. Choose a name, ensure that the CSV option is selected as well as the UTF-8 (Unicode) encoding. This will create a file that can be imported directly into a Planbook file.
-
- In Google Docs, you can choose the File-->Download As-->CSV menu item to export your file as a CSV file. Choose the UTF-8 encoding where applicable.
For additional information about your spreadsheet application and exporting to CSV, select the appropriate link below
- For Apple's Numbers: http://support.apple.com/kb/HT3719 (please choose the "Create a file of your spreadsheet for applications that can open CSV files" option).
- For Microsoft Excel (2007): http://office.microsoft.com/en-us/excel-help/import-or-export-text-txt-or-csv-files-HP010099725.aspx#BMexport
- For Microsoft Excel (2003): http://office.microsoft.com/en-us/excel-help/import-or-export-text-files-HP001130599.aspx#_Toc289084172 (Be sure to choose CSV as the export format).
- For Google Docs: https://docs.google.com/support/bin/answer.py?answer=40609&hl=en. Be sure to select CSV as the Download As type. CSV will be visible in the menu if you are editing a spreadsheet.
Importing your CSV File
Once you have your spreadsheet file converted to the correct CSV format, all that's left is to click the ![]() and choose the file that you want to import. After importing, your standards will be available underneath the All Standards standard.
and choose the file that you want to import. After importing, your standards will be available underneath the All Standards standard.
If you don't immediately see your standards, please make sure that you check for a disclosure triangle (![]() ). If you see one, please click it to reveal your standards.
). If you see one, please click it to reveal your standards.
Sharing Standards using the plist Format
Exporting Standards to a plist File
Once your standards are available in Planbook, you can easily share them with other teachers who might use the same standards. Planbook offers the ability to export standards (using the ![]() ) into a shareable file format.
) into a shareable file format.
Clicking the ![]() will cause all of the standards in your Planbook data file (including their nesting) to be stored in a file created on your Desktop. Planbook will inform you of the name of this file.
will cause all of the standards in your Planbook data file (including their nesting) to be stored in a file created on your Desktop. Planbook will inform you of the name of this file.
This .plist file can be shared with any other Planbook for Mac user via email, thumb drive or any other file sharing mechanism.
Importing Standards from a plist File
If you have a .plist file containing standards, you can easily import that file using the ![]() button.
button.
If you don't immediately see your standards, please make sure that you check for a disclosure triangle (![]() ). If you see one, please click it to reveal your standards.
Once you have added your standards to your Planbook file, you can easily track which lessons address which standards using Planbook.
). If you see one, please click it to reveal your standards.
Once you have added your standards to your Planbook file, you can easily track which lessons address which standards using Planbook.
Applying Standards
You can apply standards to your plans using either the standards slide up window or the detail mode.
Applying Standards with the Slide Up Window
The main planning window features a small toggle button that can be used to reveal the standards that you've entered. Click the standards side of the toggle and small panel will appear, showing the standards you've entered. The fly up panel is shown below:Standards can be applied to the currently selected lesson using the checkboxes. Standards can be unapplied similarly, by toggling off the checkbox.
The details text area to the right shows the full text of the standard.
Please note that standards cannot be edited in this view. You will need to use the Tools-->Standards Manager menu item to edit your standards.
When you are done applying standards, you can dismiss the standards panel by clicking again on the standards button.
Applying Standards from the Detail Mode
You can also apply standards using the detail mode. Recall that the detail mode is accessed by double clicking a lesson.
After opening the detail mode, please select the Standards and Details tab. After switching tabs, the mechanism for adding standards is exactly the same as using the slide up window.
Categorizing and Reusing your Plans
Overview
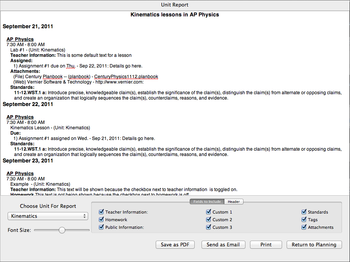
Planbook features the ability to group lesson plans into units. Units can then be used to quickly print a report listing all the lessons in the unit. Units can also be exported for reuse in a another Planbook file (either yours or a colleagues).
Using the Units Manager
Creating and Modifying Units
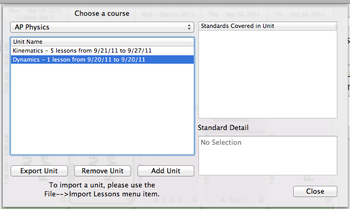
The easiest way to create a new unit is to use the Tools-->Units Manager menu item. Upon selecting this menu item, the Units Manager will appear. From this screen you can view the units that you've already created and create a new unit by clicking the Add Unit button.
To rename the newly created unit, double click the name of the unit in the table and type a new name.
Other Unit Manager Features
The Units manager also shows a list of the standards that are applied to lessons within the unit selected in the table on the left.
You can also remove a unit via the Remove Unit button.
Finally, you can export a unit to a shareable data file using the Export Unit button. For more information, see export units.
Adding Lessons to a Unit
There are several ways to add lessons to a unit.
Adding Lessons to a Unit Using the Settings Pane
The easiest way to add a lesson to a unit is using the settings pane. You can access the settings pane by clicking the small gear icon in the lower right corner of any lesson view in Day or Week mode.Once you've opened the settings pane, you'll see a pop up box with all the units that you've entered. You can pick a new unit by clicking the down arrow to show all the units and selecting the unit that is appropriate for this lesson. After selecting the unit, press the return key to apply the change.
Adding Lessons to a Unit Using the Detail Mode
Lessons can also be added to a unit using the Detail mode. The detail mode can be accessed by double clicking on any lesson in the Day, Week or Month mode. Once you have entered the detail mode, you can add a lesson to a unit by:
- Clicking the Standards and Details tab
- Changing the unit in the same manner as Adding Lessons to a Unit Using the Settings Pane.
Adding Lessons to a Unit Using Drag and Drop
Lessons can also be added to a unit by dragging and dropping the lesson onto the unit in the left side sidebar. To add lessons via drag and drop:
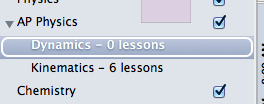
- Expand the course in the left side sidebar to reveal the units (by clicking the disclosure triangle next to the course name).
- Click and drag the lesson in the Day or Week Mode.
- Move the lesson so that the desired unit becomes highlighted.
- Release the mouse button. The lesson will be added to that unit.
Lessons may only be added to units in their own course.
Printing, Saving or Emailing the Lessons in a Unit
For information about printing, sharing or emailing units, please see the section discussing special reports.
Exporting and Importing Lessons in a Unit
For information about exporting and importing units, please visit the section discussing exporting and importing lessons. Planbook also enables you to keep track of lessons using keywords. This can be useful to track the lessons spent doing labs (as opposed to seatwork or lecture), time spent in the computer lab, or any other variable you might be interested in.
How to Tag Lessons with Keywords
Tagging with Keywords using the Settings Pane
Lessons can be tagged with keywords by first showing the settings pane. To show the settings pane, click on the small gear icon in the lower right corner of a lesson in the Day or Week modes.Once the settings pane is visible, you'll see a text box enabling you to enter the keywords for the lesson (shown to the right). Keywords applied to a lesson show in a blue oval. Keywords in progress show as normal text. The keyword is surrounded by the blue oval after pressing the return key.
Tagging with Keywords using Detail Mode
Lessons can also be tagged with keywords using the detail mode. To enter detail mode, simply double click a lesson in the Day, Week or Month modes. Once the detail mode is visible, shift to the Standards and Details tab.
Once the correct tab is visible, you'll see the same Keyword entry box as is found in the settings pane.
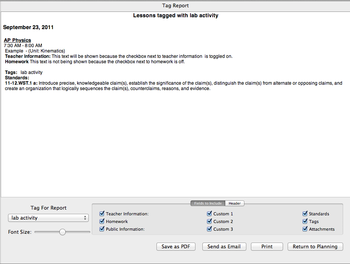
Printing, Saving and Emailing Keyword Reports
For information about printing, saving and emailing reports featuring keywords, please see the special reports section. Planbook features a "Library" where you can store previously entered lessons for reuse in any Planbook file that resides on your computer. This is designed to help you save time and reuse lessons that recur frequently.
Adding Lessons to the Library
Lessons are added to the library using the settings pane. Access the settings pane for a lesson by right clicking on the small gear icon in the lower right corner of the lesson view.
Once the settings pane is visible, you will see a button titled Send to Library. Click this button to send a lesson to the library.
Viewing Lessons Stored in the Library
To reuse a lesson from the library, you must first make the library visible. To show the library, click the button titled library at the bottom of the main Planbook window. Upon clicking the Library button, a view will slide up from the bottom revealing the lessons you've previously stored (as shown below).
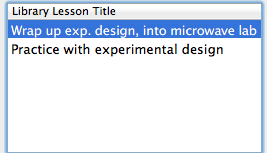
The list on the left of this view shows the lessons you've previously entered. The detail area on the right shows the lesson information contained in that lesson. Lessons in the library do not update when you modify the original lesson. You will need to re-send a lesson to the library should you make changes to the original.
Reusing Lessons Stored in the Library
To reuse a lesson from the Library, first make the library visible by following the steps listed above.
Once the library is visible, you need only drag the lesson from the list on the left onto the lesson in the Day or Week view you would like to replace. The series of images below show this process.
What is Stored in the Library
Lessons placed in the library include their:
- Text fields (title and all others).
- Assignments (and their attachments).
- Attachments.
Units and Keywords are not currently transferred.
Overview
Many teachers have different classes each year, but it's not uncommon to repeat a course or two from year to year. Planbook lets you export a course (or a part of a course) to a file that can be imported back into a different Planbook file. This feature can also be used to share a course with another teacher.
Planbook also lets you export a unit for use in a different course or a completely different file.
Exporting a Course
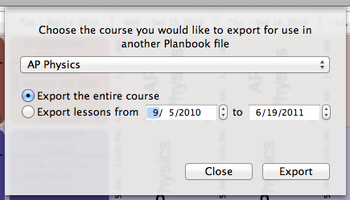
To export a course, choose the File-->Export Course menu item. After selecting the menu item, a dialog will appear asking you to choose:
- Which course to export.
- The range of dates to export
The default is to export the entire course, but by changing the dates you can select a subset of your course for export.
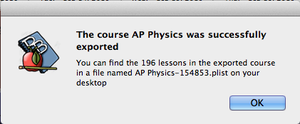
Clicking the export button will result in a file being saved to your desktop containing the lessons that you selected for export. This file is readable only by the import feature in Planbook.
Exporting a Unit
Planbook also allows exporting the lessons in a unit, rather than all the lessons in a course. To export a unit, you must first open the Units Manager using the Tools-->Units Manager menu item.
Once you have the unit manager open, you can export a unit by selecting it in the left table and clicking the Export Unit button.
The unit will be exported to a file on your desktop and a dialog will appear showing you the name of the file created.
Importing Lessons
Regardless of whether you've exported a course, a range of dates within a course, or just a unit, the process for importing lessons is the same.
First, select the File-->Import Lessons menu item. Immediately, you'll be asked to locate the file you'd like to import. Remember that Planbook places exported files on your Desktop for easy recovery.
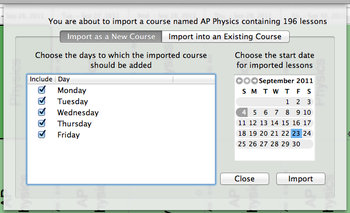
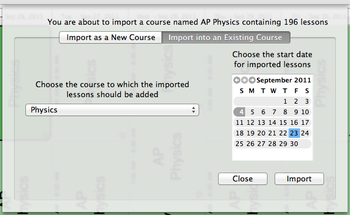
After selecting the file you'd like to import, Planbook will present a window asking for some details about how you'd like the lessons imported.
Importing to a New Course
The first option is to import lessons into a brand new course in Planbook. Choosing this option will result in Planbook creating a new course name matching the name of the exported course. If that course name already exists in your file, Planbook will modify the name of the imported course to avoid conflicts.
You also have the opportunity to select a date for the import to begin.
Since you are creating a new course, you have the ability to choose the days of your rotation or week that the course is added to.
Clicking the Import button will result in the course being created and the lessons contained in the selected file being inserted, beginning at the selected date.
Importing to an Existing Course
Planbook also lets you import lessons into an existing course.
In this case, the lessons in the file you selected will be placed into the course of your choosing. Existing lessons in the course will be rewritten with the lessons you've selected for import.
Printing, Emailing and Creating PDFs of your Plans
Overview
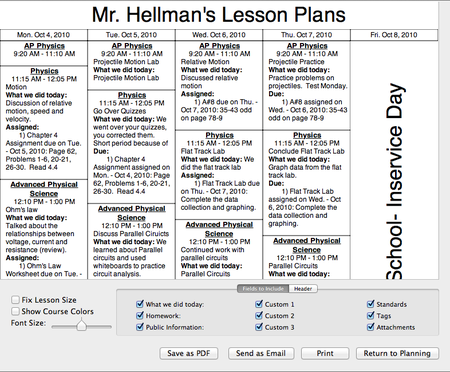
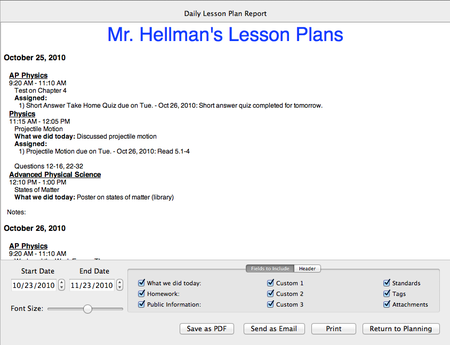
Teachers often need to print, email or otherwise share their lesson plans with others. Planbook includes features to generate PDF reports in a variety of formats. These PDF reports can be printed, emailed or saved directly to disk. The most commonly used report is the Weekly Report which tries to replicate the view generated in the Week mode of the application.
Generate a Weekly Report
To generate a weekly report, use the Reports-->Weekly Report menu item. After pressing this menu item, the main planbook view will be replaced with a view representing the weekly report (as seen below).
Modifying the Weekly Report
Changing the Week
To change the week displayed in the weekly report, it's easiest to use the calendar found at the bottom left of the screen. It is, however, possible to use any of the | methods described in the Navigation section.
As soon as you change selection in the lower-left calendar, the weekly report will refresh to represent the newly selected date.
Changing the Fields Displayed
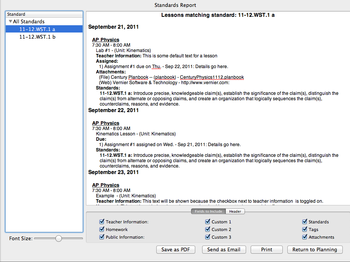
In the lower section of the weekly report, you'll see a set of checkboxes that control the fields that are displayed when generating the weekly report.You can choose to show any (or all) of the six text entry fields. If a field is selected to be shown, but a lesson does not have information entered into that field, the field will not be shown. You can also choose to show the Standards applied to a lesson, the keywords that a lesson has been tagged with, and the file/web link attachments.
Always Visible Fields
The lesson title and assignments are always visible in the weekly report.
Modifying the Report Format
The weekly report has three formatting options.
- The fix lesson size checkbox forces all the lesson boxes to be the same size in the weekly report. This forces each and every box to be the same size as the lesson occupying the most space.
- The show course colors checkbox applies the color assigned to a course to each lesson box.
- The font size slider allows you to make the font bigger or smaller to enhance readability or to fit the report on fewer pages.
Adding a Header to the Weekly Report
You can also add a customized header to the weekly report using the header tab. You can enter any text into the header field.
You can change the font or font size of the report header by bringing up the Font panel using the keyboard shortcut command-T.
Sharing the Weekly Report
Planbook offers three choices for sharing your weekly report with peers, administrators or others.
- The Print button brings up the standard Mac OS print dialog and lets you print directly to any printer accessible from your computer.
- The Send as Email button generates a PDF of the currently visible report and opens a new Mail message with the PDF as an attachment. Apple's Mail application is the only supported Mail program. Only Available on Mac OS 10.6+.
- The Save as PDF button generates a PDF of the currently visible report and lets you choose a name and location for the file. This file can be attached to a non Apple Mail message, shared via USB drive or otherwise manipulated in the same manner as any other file on your computer. Only Available on Mac OS 10.6+.
Pagination in the Weekly Report
The weekly report is not setup to allow single lessons to take more than a single page. If a lesson takes more space than one full page, it will be truncated. If you need to print lessons that take more than a single page, you can use the daily report.
Returning to Planning Mode
When you are done with the Weekly Report, click the Return to Planning button to return to the editing mode you were using previously.
Overview
In addition to a gridded weekly report, Planbook also offers a linear, daily report, that lets you choose a range of dates and courses and generate PDF, printed or emailed output.
Generating a Daily Report
The daily report is accessed from the Reports menu. To generate a daily report, please choose the Reports-->Daily Lesson Plan Report menu item. Once you choose this menu item, the main Planbook view will be replaced with a new view showing the generated report (as shown below).
Modifying the Daily Report
Changing the Range of Dates Displayed
The Daily Lesson Report enables you to select any range of dates from your calendar for display. This is done using the two date pickers (shown to the right). Changing the date pickers instantly updates the report. The navigational calendar in the bottom left corner does not affect the report.Changing the Fields Displayed
In the lower section of the Daily Report, you'll see a set of checkboxes that control the fields that are displayed when generating the Daily Report.You can choose to show any (or all) of the six text entry fields. If a field is selected to be shown, but a lesson does not have information entered into that field, the field will not be shown. You can also choose to show the Standards applied to a lesson, the keywords that a lesson has been tagged with, and the file/web link attachments.
Always Visible Fields
The lesson title and assignments are always visible in the daily report.
Modifying the Report Format
There is a single option for modifying the format of the Daily Report. You can increase or decrease the font size of the report using the Font-Size slider.The Daily Report features a number of different font sizes for the different components of the report. The font size slider will adjust all the font sizes proportionally.
Adding a Header
You can also add a customized header to the daily report using the header tab. You can enter any text into the header field.You can change the font or font size of the report header by bringing up the Font panel using the keyboard shortcut command-T.
Sharing the Daily Report
Planbook offers three choices for sharing your Daily Report with peers, administrators or others.
- The Print button brings up the standard Mac OS print dialog and lets you print directly to any printer accessible from your computer.
- The Send as Email button generates a PDF of the currently visible report and opens a new Mail message with the PDF as an attachment. Apple's Mail application is the only supported Mail program. Only Available on Mac OS 10.6+.
- The Save as PDF button generates a PDF of the currently visible report and lets you choose a name and location for the file. This file can be attached to a non Apple Mail message, shared via USB drive or otherwise manipulated in the same manner as any other file on your computer. Only Available on Mac OS 10.6+.
Copying the Daily Report
In addition to the built in method for sharing, you can also select the text in the Daily Report and copy it into any application you choose (Apple Mail, Apple Page, MS Word, etc...). To copy the text into another application:
- Double click any word in the generated daily report.
- Use the keyboard shortcut command-a to select the entire text of the report.
- Use the keyboard shortcut command-c (or the Edit-->Copy menu item) to copy the text to the clipboard.
- Switch to the desired application and paste the text using command-v or the Edit-->Paste menu item.
Returning to Planning Mode
When you are done with the Daily Report, click the Return to Planning button to return to the editing mode you were using previously.
Overview
In addition to the weekly report and daily report, Planbook offers three other reports to help your print, email or save your plans. These three reports are:
- Standards Report
- Unit Report
- Tag Report
This document will first discuss the specifics of the three reports and then the common mechanisms for customizing the reports.
Standards Report
The Standards Report is designed to show you all the lessons, in chronological order, that address a particular standard.
The Standards Report features an outline view showing all of the standards that you have added your plans. You can click on any of the standards to update the generated report to show only the lessons focusing on that particular standard. The image to the right shows the lessons focusing on the 11-12.WST.1 a standard.
The Standards Report does not look to the left side sidebar to determine which courses to display in the generated report. The Report will show all the lessons with the selected standard, regardless of the lesson's course and subject.
In the case of nested standards, the Standards Report will show all the lessons with any of the sub-standards applied.
See below for information about modifying the special reports, sharing the special reports, copying the special reports, and returning to Planning mode.
Unit Report
The Unit Report is designed to show all of the lessons that have been added to a particular unit.
The Unit Report features a pop up menu showing all of the units that you've added to your planner. Selecting any of the units will result in the report automatically regenerating, showing that unit's lessons in chronological order.
The Units Report does not look to the left side sidebar to determine which courses to display in the generated report. The Report will show all the lessons within the selected unit, regardless of the lesson's course and subject.
See below for information about modifying the special reports, sharing the special reports, copying the special reports, and returning to Planning mode.
Tag Report
The Tag Report is designed to show all of the lessons that have been tagged with a particular keyword.
The Tag Report features a pop up menu showing all of the keywords that you've used to tag lessons in your planner. Selecting any of the keywords will result in the report automatically regenerating, showing that keywords lessons in chronological order.
The Units Report does not look to the left side sidebar to determine which courses to display in the generated report. The Report will show all the lessons tagged with the keyword regardless of the lesson's course and subject.
See below for information about modifying the special reports, sharing the special reports, copying the special reports, and returning to Planning mode.
Modifying the Special Reports
Changing the Fields Displayed
In the lower section of any of the special reports, you'll see a set of checkboxes that control the fields that are displayed when generating the report.You can choose to show any (or all) of the six text entry fields. If a field is selected to be shown, but a lesson does not have information entered into that field, the field will not be shown. You can also choose to show the Standards applied to a lesson, the keywords that a lesson has been tagged with, and the file/web link attachments.
Always Visible Fields
The lesson title and assignments are always visible in the special reports.
Modifying the Report Format
There is a single option for modifying the format of the Special Reports. You can increase or decrease the font size of the report using the Font-Size slider.All of the special reports features a number of different font sizes for the different components of the report. The font size slider will adjust all the font sizes proportionally.
Adding a Header
You can also add a customized header to any of the special report using the header tab. You can enter any text into the header field.You can change the font or font size of the report header by bringing up the Font panel using the keyboard shortcut command-T.
Sharing the Special Reports
Planbook offers three choices for sharing your Special Report with peers, administrators or others.
- The Print button brings up the standard Mac OS print dialog and lets you print directly to any printer accessible from your computer.
- The Send as Email button generates a PDF of the currently visible report and opens a new Mail message with the PDF as an attachment. Apple's Mail application is the only supported Mail program. Only Available on Mac OS 10.6+.
- The Save as PDF button generates a PDF of the currently visible report and lets you choose a name and location for the file. This file can be attached to a non Apple Mail message, shared via USB drive or otherwise manipulated in the same manner as any other file on your computer. Only Available on Mac OS 10.6+.
Copying the Special Reports
In addition to the built in method for sharing, you can also select the text in the a Special Report and copy it into any application you choose (Apple Mail, Apple Page, MS Word, etc...). To copy the text into another application:
- Double click any word in the generated report.
- Use the keyboard shortcut command-a to select the entire text of the report.
- Use the keyboard shortcut command-c (or the Edit-->Copy menu item) to copy the text to the clipboard.
- Switch to the desired application and paste the text using command-v or the Edit-->Paste menu item.
Returning to Planning Mode
When you are done with any of the Special Reports, click the Return to Planning button to return to the editing mode you were using previously.
Making your Plans Available on the Internet
Overview
All users of Planbook for Mac (and Windows) have access to a free, online service called [| PlanbookConnect]. PlanbookConnect is a service designed to take the plans you've entered into the desktop version of Planbook and make them available on the Internet for students, parents and other educators.
PlanbookConnect lets you sync your Lesson Plan Text, Assignments and Attachments. With PlanbookConnect, you have complete control over which fields in your plans are made available to the public. When you log in with your username and password, all of your plans will be available for you to view.
Creating a Free PlanbookConnect account
Before syncing your plans to PlanbookConnect, you must first create a free account. Please [| create an account].
Once your account is created (you'll get an email confirmation), please return to the desktop Planbook application.
Syncing your Plans for the First Time
After you've created your PlanbookConnect account, you can use the File--Sync All To PlanbookConnect menu item to sync the plans in your file to PlanbookConnect. After pressing the appropriate menu item, you will be presented with a window asking you to log in to the account you've created (shown below). Enter your credentials (recalling that you username is not your email address).
After logging in correctly, you will be directed to close the sync window and select the File-->Sync All To PlanbookConnect menu item. You will only need to go through this login process again if you close and reopen your file.
Improving this workflow is on the Planbook 3.x todo list.
As the sync begins, you can track the progress of the sync in the bottom right corner of the main Planbook window. Depending on your network speed, the first sync may take a long time. If you have large files attached to your lesson plans, the sync may take a very long time. Please don't close Planbook while the sync is progressing.
Syncing Plans After Making Changes
After making changes to your plans, you can sync only the plans that have changed. To do this, choose the File-->Sync Updated to PlanbookConnect. This will save time and bandwidth and it's recommend you choose this option rather than syncing all plans when possible.
Managing the Sharing Settings for your Lesson Plans
Accessing Your Sharing Settings
After syncing your plans, you will want to visit [| PlanbookConnect] with a web browser and [| login]. After logging in, you'll want to select the parts of your Planbook you'd like visitors to be able to see. Remember, you will always be able to see all of your entered plans when logged in, regardless of the sharing settings you select for visitors.
Please visit the Sharing Settings link at the top right corner of the web page to manage your sharing settings. The management links found in the top right corner of the web page are shown below. These links will not appear unless you're logged in.
Directing People to your Page
There are two easy ways to get people to visit your page:
- Distribute the URL for your particular PlanbookConnect page. Your URL is of the form: http://www.planbookconnect.com/teachers/username where you must replace username with the username you chose when signing up. My account is found at http://www.planbookconnect.com/teachers/jhellman
- Direct visitors to http://www.planbookconnect.com and have them use the search field to find your page.
The Sharing Settings web page includes a section (shown to the right) that enables you to choose which courses in your Planbook are shared with others.
To control the courses that are made public, toggle the checkboxes to indicate the sharing status of each course.
Once you have selected the courses you'd like to share, be sure to apply your changes.
By default, all courses are shared.
You'll also have the opportunity to choose which fields you'd like to share.
To control the fields you'd like to share, toggle the checkboxes next to the field name.
Assignments (and their attachments) are always made public.
Files and links are made public based on the publish setting you enabled in the Desktop version of Planbook. See Attaching Files and Links for information about managing publish settings.
The lesson title is always always visible.
If you plan far into the future using the Desktop version of Planbook, your future lesson plans will also be available on [| PlanbookConnect]. To control how far in advance visitors can see your plans, choose the appropriate setting. You have six options:
- Share all lessons.
- Share lessons on or before today.
- Share lessons on or before tomorrow.
- Share lessons before the end of the week.
- Share lessons before the end of next week.
- Share lessons before the end of the month.
Remember, that regardless of this setting, you will be able to see all of your plans when logged in.
Directing Visitors to your Site
There are two easy ways to direct students, parents or other interested people to your PlanbookConnect site:
- Send visitors directly to your PlanbookConnect page. Your URL has the form: http://www.planbookconnect.com/teachers/username where you replace username with the username you chose when creating your account. My page, for example, is found at http://www.planbookconnect.com/teachers/jhellman
- Send visitors to the main PlanbookConnect homepage, http://www.planbookconnect.com, and direct them to search for you or your school.
Sharing Plans on Your Own Website
- ==Overview==
If you plan on publishing your lesson plans to your own website, you'll want to customize what's published and shared with the world. All of the options for publishing are contained in the Tools-->Publish Setup menu item. Please note that the publish options contained here do not impact PlanbookConnect publishing.
After opening the Publish Setup window, you'll be presented with the following window. The rest of this page will discuss the options found within.
Choosing a Theme
Planbook offers a number of themes for your published output. You are welcome to choose any of the themes from the available themes table. Changing the theme is as easy as selecting a new theme from the list. The preview at the bottom of the screen will instantly update to reflect these changes. An internet connection is required to preview themes.
Modifying the Published Output
Planbook publishes three types of pages to your website. First, Planbook creates a landing page that lists all your classes. Planbook also generates a monthly calendar showing the lesson titles for each month you teach. Finally, Planbook generates pages for each of your lessons. All of these pages have customizable options.
Modifying the Landing Page
Planbook offers two customizations for the landing page. You can edit the title and a sub-heading for this page.
To enter a new title for your page, simply type a title into the title field. I recommend something similar to what is shown in the image to right, obviously customized for your classes.
You can also enter a subheading and it can be helpful to direct less technical users of your website to click on the links below to access your classes (again, shown to the right).
To preview these changes, you will need to click the Refresh button in the lower portion of the Publish Options window.
Modifying the Month Page
The second type of page that Planbook publishes is a monthly listing of your lessons in each class. To edit this portion of your publish output, switch to the Month Index tab.
You can enter a header and a footer for this page. The header is displayed just above the month calendar and the footer just below. To edit each of these, simply type into the text fields.
If you don't enter lesson titles, it can be a bit unclear where to click to access the entire lesson plan. A header directing users to click on the date below can be a helpful hint.
To preview these changes, you will need to click the Refresh button in the lower portion of the Publish Options window.
Modifying the Lesson Page
You can modify the lesson fields that are published using the "Single Lesson Listing tab.
Once you switch to the Single Lesson Listing tab, you'll see checkboxes next to the names of all your lesson fields, as well as for Web Links, Files and Standards. You can choose to publish these fields, or not, based on the status of the checkbox.
If you choose to publish web links and/or files, Planbook will only publish the Web Links and Files marked for publish. You can still keep tests and other private documents private. For more information about modifying publish settings, please see Attaching Files and Links.
If you change the fields for display, you will need to re-publish all of your lesson plans for the changes to take effect.
- ==Overview==
After you've setup your Planbook file for publishing to a local folder, FTP Server or MobileMe, you're ready to Publish.
To publish your Planbook file to one of these services, please first choose the File-->Publish menu item. This will bring the up the Publish window that enables publishing to your chosen service.
General Publish Settings
Regardless of whether you're publishing to a local folder, FTP server or MobileMe, you must set the dates for the publish appropriately. There are two sets of dates and each must be set correctly for your plans to publish.
- The Calendar Dates control the range of dates for which the monthly calendars will be generated (or re-generated). Choose the dates here carefully or else the monthly calendars may not contain links to the lessons you've setup for publishing.
- The "Lesson Dates" control the range of dates for which lessons are published. Choose these carefully, as well, or else you might have links in your monthly pages that cannot be found.
Publishing to a Local Folder
If you want to publish to a local folder, all you need to do is choose a folder on your computer for the published Planbook output. Publishing to a local folder can be useful if you've got an FTP program you use to copy your plans, or if your local network provides a folder that's accessible directly from the Internet.
If the folder you specify doesn't exist, Planbook will try to create it.
Publishing Directly to an FTP Server
If you have an internet account that includes the ability to connect via FTP to a web accessible folder, Planbook can publish your files directly to that server. You will need to contact your school or internet service provider to determine if you have this ability, and for the address, username and password for your account. You FTP connection must be plain FTP, not SFTP or any other secure FTP variant.
You will need to provide 4 pieces of information in order for Planbook to connect to your FTP server.
- Server Address (this is likely the same as your web site URL, without the www at the beginning. It should not include http://)
- Path to your web accessible folder. Often this is '/'public_html but you will need specific knowledge about how your account works from your system administrator for this information.
- Username. Often this is the same as your email username, but not always
- Password.
The Port setting will, in almost all cases, be 21.
Publishing to MobileMe
This feature is available to purchasers of Planbook who did not but Planbook at the Mac App Store. Apple is discontinuing their MobileMe web hosting service and has not announced a replacement service in the new iCloud offering. This feature will be removed from Planbook when Apple shuts down their hosting service (Planned for July, 2012). If you are a MobileMe subscriber, please make plans to find a new service (likely http://www.planbookconnect.com) for hosting your lesson plans.
Planbook automatically identifies your Mobile Me account and you don't need to do anything special to get your plans published to a web accessible folder. If you want to publish to a subfolder (because you already have a website hosted at MobileMe), you can enter the name of any subfolder you'd like. The folder must be found in the Web-->Sites folder of your iDisk.
Important notes about publishing to MobileMe:
- You must already be logged into your iDisk for publishing to MobileMe to succeed. To ensure you're logged in, please use the Finder application to navigate to your iDisk. If you can view the files in your iDisk via the Finder, you're logged in.
- Planbook will overwrite any existing index.html files in your Web/Sites folder. If you don't want Planbook to overwrite your existing pages, you'll need to publish to a subfolder
Actually Publishing your Files
Once you have selected the dates for your publish and the method you'd like to use, you can publish your plans using the Publish button. Publishing lots of lessons (especially with attachments) via FTP or MobileMe can be quite time consuming. Planbook will track your progress in the bottom right corner of the main application window.
Planbook Preferences
Overview
Planbook has a number of user-customizable preferences that you can set. The preferences for Planbook are found in the Planbook-->Preferences menu item. This document will detail the preferences you can set.
Preferences
Startup Options
When Starting Up, Open Last Saved File
This preference, available on OS X 10.6 or earlier, makes Planbook open your last saved data file when it is restarted. This is unavailable on OS X Lion because the Operating System now does this automatically.
Display Options
In Week and Day View, use a fixed font of size
This preference forces Planbook to use a single font size when displaying plans in the Week and Day view. This is helpful if you want to increase the size of the lesson plans (perhaps for display on a projector). After enabling this preference by checking the button, you will also be able to choose a default font size.
Size Lessons Proportionally to Duration
This is a new feature in Planbook 3 that allows the lesson views to occupy space based on their length. In previous versions of Planbook, all lessons occupied the same amount of vertical space. This feature enables shorter periods (such as recess) to take less space in your planning window
When displaying standards in a report, show
This lets you choose what information is shown when including standards in a printed report.
When displaying standards in the planning modes, show
This lets you choose which information from your standards is visible in the regular views
Display Course Times
This preference determines whether the times for lessons are shown on the left side of the lesson views. Planbook 3 does a better job of not overlapping text when displaying times, and also shrinks the time (displaying less information) as the box gets smaller. Planbook will automatically hide the time if it cannot be displayed without overlapping other text.
Show day of year in week and day views
This shows the day of the school year in the date button above the lesson views in day or week mode.
Use numbers, rather than letters, for rotating day indentification
Use this is you'd prefer your rotating schedule to display as Day 1, Day 2, etc... rather than A Day, B Day, etc...
When Viewing By Month, Show:
This is the field that will be displayed in the month view (space permitting).
Save Options
Create a backup copy when saving your file
This will automatically back up your file when saving. Turning this option on will reveal another preference for the backup location.
PlanbookConnect Options
Sync attached files not marked for publish (only visible to you)
If you turn this preference on, attached files that are marked private (not publish) will not be sent to PlanbookConnect. If this preference is turned off, all attached files are synced but files that are not marked for publish are visible only to you when logged in.
